Rendering fat is an old-fashioned method for preparing solid animal fat to use later by separating the fat from any other tissue in the fat. Lard, for example, is a rendered fat. The happy by-product of rendering pork fat is the cracklings, those small bits of crunchy, tasty roasted fat, which sometimes have a bit of meat in them.
When you render ham fat, those bits of fat, the cracklings (with maybe some meat), have a taste and texture similar to bacon bits. The rendered fat, itself, tastes like ham or bacon. I use it in cooking the same way I would use saved bacon fat.
To render fat:
In the process of using a baked ham, simply set aside all of the fatty bits and chunks that you don't want to consume in their current state. On both the shank and butt portions of ham, there can be a substantial swath of fat across part of the exterior. Go ahead and bake the ham with the fat on, scoring well to render fat while baking. Not all of the fat will render in such a large swath without severely overcooking your ham. |
| initial batch of fat dices rendering |
- Place about 1/2 cup of fatty dices into a heavy-bottomed saucepan or dutch oven (depending on amount of ham fat to render, more fat = bigger pot).
- Heat over low, and allow fat to render slowly. Stir occasionally. On my gas stove top, I use a gas mark 2, out of 1 through 5.
 |
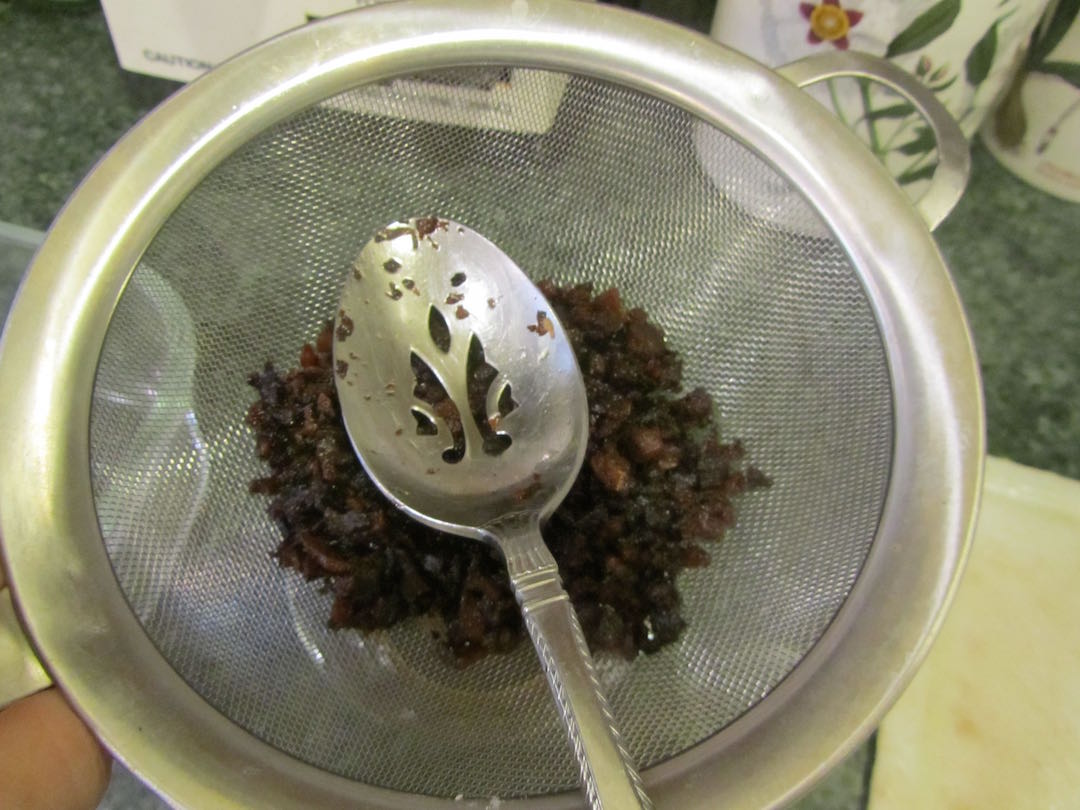
| cracklings removed to a sieve over a small bowl |
- When there's a nice pool of rendered fat, and this first batch is done, use a slotted spoon to scoop the cracklings out of the pot and into a sieve, which is placed over a dish to catch drippings.
- Add the remaining fat dices (again about 1/4 to 1/2-inch dice) to the rendered fat in the pot. (I prefer to leave all my dices about 1/4-inch, as I just like the smaller "bits" to add to salads or to top soups.)
- If you have any especially meaty bits, add those to the rendering about half-way through, to ensure that they don't burn. Continue to render the fat slowly, stirring from time to time.
 |
| some of the meatier dices I add about halfway through cooking main batch |
- At the very end of cooking, remove the cracklings to a strainer/sieve or scoop into a piece of loosely woven cheesecloth. Use the back of a spoon to press out the fat into the dish below. Alternatively, put the cracklings into a cheesecloth spread over a dish, then squeeze out the liquified fat into the dish to save.
 |
| pressing the extra fat out of the cracklings to save for cooking |
- The liquid fat is your rendered fat to be used in cooking, just like reserved bacon fat.
- The cracklings can be used in recipes for cornbread and egg salad, or to top soup, salad, and casseroles. Store cracklings in the fridge, or if not using within a day or two, freeze. Rendered fat for use in cooking can be stored in the refrigerator for up to 3 days or in the freezer for several months.
 |
| I used this batch of cracklings to top a bean and veggie soup -- tastes like bacon bits , Yum! |
You'll find this post, and many others like it, a click away, through this link (click) -- there's a compilation of my recipes, shopping lists, and menu plans that illustrates how I feed my family of 4 adults on $125 to $135 per month.

Thank you so much for explaining how to do this! I have seen you mention using ham/turkey/chicken fat and wasn't exactly sure how you were getting clean, rendered fat. I have two hams in the freezer that I need to bake in the next couple of months and this will be helpful.
ReplyDeleteDo you freeze in a jar or do you freeze in smaller cubes first? I have some garlic in olive oil in the freezer and it's a real bear to get cooking sized portions out of the jar; wondered if you had the same experience freezing other fats.
Hi Laura,
DeleteOh good! I'm glad this could help you.
Most of the time, I am able to pour off fat from roasting meat, directly into a container to store in the freezer. But, rendering works for those chunks of fat, that are still solid after roasting.
To use the fat -- frozen fat is usually brittle enough that if I stick a table knife into it, while frozen, a chunk will break off. I freeze in shallow containers, as it breaks off more readily. I'd say the fat is about 1-inch at the most, in thickness, sometimes only about 1/2-inch. We have several shallow plastic containers (like what hummus sometimes come packed in at the supermarket). These are just the right size for freezing fat, for us, nice and shallow.
And sometimes, like with the rendered ham fat last week, I just kept the fat in the fridge in a custard cup, and made sure to use it within the week.
Your garlic in olive oil might be too thick to get a chunk broken off easily. You could allow it to thaw enough to spread thin, on a flat baking sheet, lined with plastic wrap. Refreeze, then score into cooking-sized portions, and fold the plastic wrap over the whole sheet of oil/garlic, to store in the freezer. When you need some, just break off at the score line.
Hope this helps!
Thanks! I will have to make sure I have something shallow enough for the fat. I think you are correct about the garlic and olive oil; honestly I had been planning on just keeping it in a jar in the fridge but then I came across a few (somewhat alarmist) articles about botulism in these kinds of concoctions and decided to freeze just to be on the safe side. The jar is narrow and deep. I will try thawing and re freezing in a thinner layer. I have some tiny cocktail ice cube trays that I never use and they might be good for this.
DeleteHi Laura,
DeleteYeah, I've read the same stuff about home-preserved garlic in oil. Better to be safe than sick. I think you have a good plan with the cocktail cube ice tray.
I’ve used ice trays to freeze different Things and after frozen put in freezer bags
DeleteWe always had "bacon" and eggs on Saturday evenings for dinner when I was a child. Only the " bacon" was the crispy bits as you describe.
ReplyDeleteHi Teresa,
DeleteOooh, I was thinking cracklings would be good filling for an omelet, too. Your "bacon" and eggs sounds like it was probably delicious.
I published my previous comment using Google. When I tried using my name ( Teresa) on my PC and publishing that way my PC cannot pull up the photos to " prove I am not a robot". Usually I do not have this problem on my ipad( the pictures appear). This time I hit the wrong tab ( instead of name I hit Google account) and it let me sign in. Not sure if others have had problems with the photos appearing. I usually forget my google password so.. That's why I was posting undermy name.
ReplyDeleteHmmm, these blogging platforms are free,, but they do have their issues from time to time. Hopefully it was a glitch associated with this one page, and everything will be back to normal tomorrow.
DeleteThis is a timely post. While we are sweltering under heat and humidity, finding neighbors eating/ordering out, picking up take out, buying the typical burgers an grilling foods, I am eyeing sales on fzn turkey breasts @89/lb (got 2 for freezer) and hams this week for 99 (will grab 2 as well). It's hot but I'm planning for Fall.
ReplyDeleteHi Carol,
DeleteI saw you mentioned on your blog the sales on what we think of as fall meats. Thanks for the heads- up on that. I'll be keeping my eyes open for similar sales, here.
Correction: I paid 69/lb for shank, 79/lb butt hams today. I now have 4 fzn hams. Too good of a deal to pass up.
DeleteI have never rendered fat or even thought about rendering fat before, so this was interesting.
ReplyDeleteHi live and learn,
DeleteI think rendering fat is one of those kitchen-y things that has gone by the wayside in the last 100 years. For the most part, we have no need to do this. Meat is often well-trimmed when we buy it, so no fat to render. But it always bothered me with hams, that large swath of fat on the outside. I hated to waste it, and I'm not one to eat large chunks of fat (unless they're crispy like bacon). This is a good solution for me.
Thank you so much for these ideas. I will be using mine today with my Thanksgiving Dinner to make loaded potatoes and adding them in my collard greens as well. Happy �� Day! ��
ReplyDeleteOh yum! Those loaded potatoes and collards sound delicious!
DeleteHave a happy Thanksgiving!
Today is not my "smart" day. The instructions on my ham was to remove excess fat before baking...so-o-o-o-o....I cut quite a bit off along with most of the skin(?)thinking it could be used to make pork rinds or chitterlings(?) whatever those are! Does this mean I've ruined my ham??? It was a precooked shank!
ReplyDeleteYou're not alone, yraddicgt, I did something like this with my first ever ham. Your ham is probably fine. Cover it with foil for most of the baking. Then for about the last 20-30 minutes, uncover and allow the outside to brown, lightly.
DeleteAre you thinking of cracklings? The browned bits of ham fat that are used like bacon bits? you can still do that with your reserved ham fat. just dice into small pieces and brown, as directed above.
I'm sure your ham with be delicious.
Thank you Lili...ham was great and I will cook up the fat for the cracklings and "try" the skin for pork rinds!
DeleteSo glad for you, yraddicgt!
DeleteI really appreciate this post RE: Throwing out the fat. I don't throw it out because people are starving around the world. Plus the little piggy died. I try to honor all that I have been given. What little organic waste I have I share with critters and such.
ReplyDeleteI threw out a hambone and an hour later a huge Raven flew by with it in it's mouth! I like it best in Navy bean soup. Im a little fat but much blessed.
Thanks again, -Melissa
Absolutely with everything you said. The scraps I cannot imagine utilizing myself gets further processed to incorporate into suet cakes (along with wild bird seed, stale Fritos & cereal & crackers, peanut butter, extra lard, etc). The birds LOVE IT...NEED IT. So easy and cheap to make suet.
DeleteAbout how long do you cook the fat? Do the cracklins get crispy? So far, I've rendered fat, and the fat is dark in color, but it's not especially crispy.
ReplyDeleteHi Judy,
ReplyDeleteI cook the cracklings until they're pretty dark brown. I think that the smaller the dices to begin, the crispier they'll become. Larger dices will have more interior parts that don't crisp up as much. As far as how crispy they get, I think like the crispy part of fatty bacon. Good luck with yours and I hope you're pleased with the rendered fat to use in cooking.
Lili, I tried it but the reverse seemed to happen...rather than getting a pool of fat with cracklings on top, I got a hardened layer of sorta burnt something on the bottom with a bunch of wobbly chunks of fat on top. I did this in a pressure cooker on saute and switched back and forth between medium and low heat...what did I do wrong?
ReplyDeleteHi Milt,
ReplyDeleteI can only speak to my own experience, which is using an open saucepan on the stove top. I've never tried this with a pressure cooker, so I don't know what the differences could be that would cause your situation to occur..Does the pressure cooker have a lid on at all times? Perhaps that could be the difference, as I render fat in an open pot. I also render in batches that are not very large, about 1/2 cup at a time. Could your batch of fat dices been larger than that amount?
I wish I had the answer for you. Any chance of salvaging what you can and putting some of the fatty chunks into an open saucepan to render? Good luck with this, Milt.
ok, I'll try a saucepan next time...do you start with some oil?
ReplyDeleteHi Milt,
ReplyDeleteI'm so sorry I didn't see your 2nd post until this evening. Sometimes these posts go into another folder that I don't check often.
Okay, so for your question -- no you don't need to use any oil. Start with 1/2 cups of small dices of the fattiest (least meaty) pieces of the fat. Keep the heat of your stove on LOW. The fat will slowly seep out of the pieces. Stir occasionally to prevent burning. After some time (5 or 10 minutes), you'll see there is a pool of liquid fat at the bottom of the saucepan. At this point, you can add the rest of the fatty dices. When these look about halfway done (golden, but not dark brown), add the meatier dices and continue rendering slowly over LOW. When they're all done, the bits should look dark brown and there should be a nice pool of liquid fat. Strain the fat from the bits. Use the bits in cornbread or greens and reserve the fat for using in cooking as you would use oil or butter for sautes. Keep in mind that the rendering is a slow process.
Good luck with your next ham, Milt!
Thank you for such a great tutorial!
ReplyDeleteI'm so glad it helped!
DeleteThank you!!! I was clearing out the freezer and found a large bag of ham fat i was saving for... i dunno, i just can't throw anything that has potential away. Finally finding your post gave me the direction i needed to render that stuff and get 1.5 cups of fat and 0.75 cup of yummy bits. I cut the skin off my fat and fried the skin separately after i rendered the fat, but the result was rubbery and unpleasant. Thank you again!
ReplyDeleteI just sliced up & froze an uncooked ham. So I have uncooked ham fat left. Should/can I bake it in the oven & render the fat or in the crockpot (rather than on the stove)?
ReplyDeleteI just sliced & froze an uncooked ham. So I have uncooked fat left over. Can I render the fat by cooking it in the oven or in a crockpot (rather than on the stove)
ReplyDeleteHi Elizabeth,
DeleteI haven't rendered fat in a crockpot, but I think it could be done. Dice the fat into 1/4-inch pieces and set the crockpot on LOW. Stir it from time to time. Alternately, you could do this in the oven, too. Dice the ham, place it in a metal baking pan (something with 2-inch sides or higher so it doesn't splatter all over). Set the oven to about 250 degrees F. Stir from time to time. It should take an 1 to 2 hours.
Good luck!