Stay Connected

Wednesday, June 26, 2024

Slowly getting back to normal

Yesterday afternoon I had my post-op appointment. I'm coming along fine. My stitches are just beginning to fall out, and there's no sign of infection. If you've never had dissolvable stitches in your mouth, my experience has been that they don't simply disappear. They dissolve in spots along the thread, then short lengths fall out. It will feel like a loose thread hanging inside my mouth. Often, if I simply do a salt water rinse, that short length of thread will fall out. I've just begun losing bits. My surgeon tells me that these stitches typically take between 7 and 14 days to completely dissolve. After my last procedure, it took about 10 or 12 days before those thread bits stopped falling out. TMI, I know. 

Anyway, I'm very gradually resuming some of my workload around the house.

Today I managed to work in the garden in three brief spurts for a total of about 45 minutes over the course of the day. I transplanted some more petunias to some pots, collected viola seeds, mulched the potatoes beds with grass clippings, did a little watering, and harvested a large container of lettuce to be used in the next couple of days. That was it for me. Yesterday I harvested a bunch of turnips, washed them, bagged the roots and leaves to use in meals this week, and chopped and froze the stems to use in stir fry meals next fall and winter. 

I also spent some time just inspecting everything outdoors. The strawberries are ripening quickly. The marigolds are growing and looking great. We lost a couple of cucumber plants, but I had planted extra, just in case. We should be good. We have a bird nesting in a hanging basket. We are trying not to disturb the little family, but I spied the basket swaying a little (on a very still day), and one daughter said she could hear tiny squawks. Although I feel like I missed a week of summer life, nature allowed some of our trees to flower just a little late. Two of our dogwoods are in full bloom this week, about 2 weeks later than usual.

After my little bursts of garden attendance, I went out to the mailbox for the first time in just over a week. Yikes! That was a lot of mail. I paid the bills and discarded the junk mail. It feels good to catch up on ordinary chores.

Bit by bit I'm getting back into the swing of things. What's been going on in your week?


Tuesday, June 25, 2024

Things I Didn't Know

fake flowers washed in cold water -- do this

You can wash cheap, Dollar Tree fake flowers. 

Hand wash in a sink of cold, soapy (liquid dish soap) water. Swish around, gently rub off any dirt, dust, or grime. Rinse in clear cold water. The key is to use cold water. Hot water will cause the colors to bleed into the water. But in cold water my flower color held up well. After rinsing, give them a good shake then transfer to your washing machine and use the spin cycle (no rinse) on gentle to remove most of the rest of the water. Stand up in a jar or glass to air dry overnight.

fake flowers washed in hot water -- don't do that

I was collecting "red" things from my house a couple of weeks ago, to create some patriotic displays in our living areas. I had some fake red geraniums and mums sitting outside on our covered front porch for a couple of years. They were quite dirty. I washed the first stem in hot, soapy water, and a lot of color bled out. I then washed a second stem from the same set in cold, soapy water and the color mostly stayed with the flowers (minimal color bleed). After this trial, I washed all of my fake red flowers in cold water and had success. Of course, I'm not an expert on this topic. But with cheap, dollar store fake flowers that are so dirty you don't want to display them any longer, it's worth a shot to see if they can be rescued before tossing them out. The way I figured, I wouldn't know unless I tried.


The American flag, when displayed vertically, should have the field of stars (the union) on the left side.

We're all familiar with how the American flag looks when it's on a pole or displayed horizontally. On Flag Day, earlier this month, I went to display my father's flag inside our house. (We have a different flag that we use outdoors on a pole.) So I decided to display this flag vertically, hanging from the upstairs' handrail. I originally hung it with the field of stars on the right side of the flag. Then my daughter noticed a little instruction booklet that came in the box with the flag. It says when hanging the flag vertically, the field of stars would be to the observer's left. I didn't know this, but now I do.


Our Goodwill Outlet (the Goodwill clearance store) gives away free reusable shopping bags with each purchase.

Our local Goodwill stores have begun saving all of the reusable shopping bags they receive with donations. Then they give them away in the outlet stores for customers to carry away their purchases. This most recent time my daughters shopped there, they got this cloth shopping bag to hold their "new" stuff. What a wonderful thing for Goodwill to do -- giveaway useful items they can't seem to sell. We now have one more reusable grocery bag. This one looks like it will last through many years of grocery shopping. I had no idea Goodwill was doing this.

Just a few things I didn't know.


Do you put up a flag for Flag Day or the 4th of July (or Canada Day, or other national holiday where you live)? Have you ever decorated for a patriotic holiday? Would you take a gamble and wash some dirty fake flowers? What's been your best supply of reusable shopping bags?

Monday, June 24, 2024

My Week of Menus for a "Soft" Diet

Thank you, friends, for hanging in there with me while I took several days off from blogging recently

I didn't have a guide for how or what to eat, with the exception of it needed to be soft, non-spicy (I interpreted this to mean non- heat spicy, not no spice at all like cinnamon), smooth, and chilled or cold for the first 24 hours (heat and spice can increase bleeding). I was instructed to stick with soft and smooth for several days as the incision area healed. You'll see that by the end of the week I was not only eating more variety and texture, but more volume of food.

As to what I could eat, that was up to me. Weeks earlier, I thought through some possibilities that would work for our budget and my tastes. Family members gifted me with suitable foods that I may have been reluctant to buy for myself due to cost. Otherwise, I primarily chose foods that we had on hand.

All of my meals at the beginning of the week were different from what my family was eating. At first, they took turns cooking for themselves and making food for me. Later in the week, I was able to make my own breakfast and lunch, plus modify my own dinner to work for me. By the last day, I was once again cooking dinner for the family, just modifying my portion.

Day 1

lunch
post-op first "meal"-- supposed to be cold foods for the day

baby food fruit puree pouch stirred with applesauce
pumpkin pudding (a thin cornstarch pudding mixed with canned pumpkin, sweet spices and maple extract, prepared the day before)

snack 1
raspberry sorbet 

snack 2
more pumpkin pudding

dinner
thin mashed potatoes with melted cheddar stirred in, then cooled (to meet the cold food requirement)
silken tofu pureed (using smoothie blender) with honey and vanilla extract

Day 2

breakfast
cream of wheat with soy milk and butter

lunch
chicken bone broth, served warm not hot, with crushed whole wheat saltines stirred in till soft
mashed potatoes stirred with canned pumpkin puree, served warm

snack
baby food fruit puree stirred with applesauce

dinner
pureed (using pitcher blender) cream of broccoli, potato and cheese soup with crushed whole wheat saltines stirred in, cooled
raspberry sorbet 

Day 3

breakfast
cream of wheat made with soy milk, butter and drizzle of honey, cooled

lunch
chicken bone broth, served warm not hot, with silken tofu chunks and crushed whole wheat saltines
baby food fruit mixed with applesauce
chocolate soy milk

dinner(greater variety and texture in tonight's meal)
scrambled eggs with cheese, cooled 
well-cooked macaroni noodles with butter 
pureed (using immersion blender) cooked spinach
canned pumpkin puree with butter and salt

Day 4

breakfast
cream of wheat cooked in soy milk with honey and butter

lunch
chicken bone broth with soft tofu chunks, very finely minced baby turnip greens, and crumbled whole wheat crackers
baby food fruit puree stirred with applesauce and canned pumpkin, then topped with graham cracker crumbs. (I discovered I needed to allow the graham cracker crumbs to soften for a bit. Eating the crumbs while still crispy was like rubbing sand into a wound.)
tiny serving of raspberry sorbet (about 2 tablespoons)

snack
pumpkin pudding

dinner
well-cooked macaroni topped with marinara sauce and cheese
well-cooked carrots with honey-mustard glaze

Day 5

(The stitches hurt, so I'm still on a soft food diet. Even though the carrots were well-cooked last night, they still required chewing motion in my mouth.)

breakfast
oatmeal cooked in soy milk, with honey and butter (I cook the hot cereals in milk to boost the protein of my breakfasts.)

lunch
smoothie (soy milk, peanut butter powder, beet powder, pureed pumpkin, banana, honey), made in smoothie blender

still hungry, so I made some cheesy mashed potatoes

dinner
egg salad, finely chopped
canned pureed pumpkin with butter and salt
pureed (using smoothie blender) broccoli
cheesy mashed potatoes

I gave up on the pureed pumpkin and the potatoes at dinner -- just too much pureed stuff. So I made myself a cup of cocoa in which I melted marshmallows. Sometimes, you just need a treat.

Day 6

I thought I'd be off of this soft diet by now. But I guess it just takes a while for healing.

breakfast
scrambled egg 
leftover cheesy mashed potatoes

lunch
baby food fruit pouch stirred with applesauce and topped with graham cracker crumbs
a couple of tablespoons of softened peanut butter

dinner 
first quasi normal dinner with the family, eating mostly what they had, just modified to fit my needs

pureed (using immersion blender) teriyaki chicken 
pureed (using immersion blender) turnip greens with onions and garlic
soft bread, crust off, torn into cubes and soaked in the liquid-y chicken
cocoa for dessert

Day 7

breakfast
1 egg and the last of the cheesy potatoes plus minced chives made into a large potato pancake

lunch
pureed (in smoothie blender) silken tofu, blueberries, vanilla, and honey (eaten with a spoon, like yogurt)
soft buttered bread, crusts cut off
a large spoonful of softened peanut butter

dinner
For tonight, I'm making a vegetable and beef soup. I'll puree my portion. I think we'll have bread and butter with the soup. I'm getting really close to not needing pureed foods. I have very little pain now. At lunch today I was able to simply eat my slices of bread the way a normal person would, and not need to cut it into bites. As long as I chew on the opposite side all of the time. Also, I made a pumpkin snack cake to use up the leftover canned pumpkin. We'll have that for dessert.


Thoughts about my menus

Day 1 was short on protein, vegetables and whole grains. However, I was allowed a light breakfast before the procedure. For my light meal I had a smoothie made with a small banana, soy milk, flax seed meal, honey, beet root powder, and peanut butter powder. This meal added a full serving of vegetables (beet powder), 1 fruit, fiber in the flax seed meal, and protein in the soy milk and peanut butter powder. By the end of Day 1 I managed to get over 5 servings of fruits and vegetables. It felt like I ate a lot of sweet foods that day, though -- not great.

On day 2, I incorporated slightly thicker foods with mash-able chunks in the saltines soaked in soup/broth. I was also allowed to eat warm foods, just not hot or spicy. Heat and spice can increase risk of bleeding from sutures in the mouth. I didn't have very much post-op bleeding, fortunately. But I didn't want to create a problem where it had not previously existed. I also added more savory foods this day in the bone broth and the broccoli/cheese soup. I was still lean on protein. A major difference between day 1 and day 2 is that on day 1 others were bringing me all of my foods. Whereas on day 2 I was getting my own breakfast, lunch, and snack. My daughter made dinner for the whole family that night. They had their soup non-pureed and with carrot sticks plus the crackers. I didn't eat as many fruits and vegetables on this day, but I did manage to get some whole grains in with the whole wheat crackers.

Day 3 -- the first two meals were very soft foods. But by dinner I could have soft chunks, like scrambled eggs and well-cooked macaroni noodles. I had really missed having foods with texture by this point. But I didn't want to risk breaking open the wound site. Again, I fell short of the 5-a-day fruit and vegetable recommendation. But I did do better with protein, having the scrambled eggs with dinner. By the way, bone broth has a fair amount of protein. My pint-size box of chicken bone broth (Kettle & Fire) contains 20 grams of protein. I used just under 1 cup for each meal, providing about 9 grams of protein in bone broth and 2 or 3 grams of protein in the tofu per bowl of my soup. Also by day 3, I was doing better with variety in all of the foods that I ate. 

By day 4 I was getting the hang of preparing enough varied soft foods for my meals to meet my nutritional needs.

Day 5 and I'm growing weary not eating chewy foods. Despite what I'd like right now, dinner last night involved too much chewing. I'll go softer for dinner tonight. Time will pass and I'll soon be able to eat chewier foods again. You know what they say, when the patient begins complaining, they are beginning to recover. Breakfast of oatmeal was not soft enough for this stage. You don't think about oatmeal as being chewy, but it is, just slightly. It also has larger particles which floated around in my mouth and irritated the stitches a bit.

By day 6 and day 7, I was managing better, eating slightly more textured foods and making ordinary family meals work for me.


I didn't pre-plan my meals for these days. Instead I made sure there were plenty of soft foods that I could choose from on hand. 

pre-made foods and tools that made preparing a soft diet easier

  • blenders to puree soup, tofu, cooked vegetables and meat
  • baby food fruit puree pouches -- I mixed these with jarred applesauce, as the baby food pouches were too banana-y and peach-y for me. My husband gave me a couple of boxes of fruit puree pouches earlier this spring. I saved them for this surgery that I knew would be happening.
  • boxed bone broth -- my son and daughter-in-law gave me 2 pint-sized cartons of bone broth on Mother's Day 
  • silken tofu -- it's already soft, but can be made completely smooth with a blender or cubed and dropped into broth
  • instant mashed potatoes to make single servings of potatoes
  • canned pumpkin puree -- can be added to smoothies, mashed potatoes, broth soups, or eaten as is seasoned with butter and salt or butter, brown sugar, and a pinch of spice
  • jarred applesauce to moderate the flavor of the baby food and pureed pumpkin


We used 3 types of blenders this past week, an immersion blender, a smoothie blender, and a pitcher blender. The immersion blender is great for small quantities, like a single serving of cooked greens or tender meat like chicken breast. The smoothie blender works well for smoothies and slightly larger amounts of food and liquid. It's especially useful for consuming directly out of the container, like with smoothies, or when using the smallest container, a single portion of vegetables. For a container blender, the smoothie blender is easy to clean up afterward, just wash a cup and a blade assembly. The pitcher blender worked better for larger quantities, such as a couple of bowls of soup.

I pureed vegetables and chicken in cooked form, adding water to the blender/container to aid in pureeing. I found that vegetables,. once pureed, often needed additional seasoning, due to the watering down of added liquid. Silken tofu, while already very soft, benefits from pureeing, too, becoming very smooth and yogurt-like in texture.


So that was my week in meals for a week following "mouth" surgery. Could I have planned better? Absolutely? Could I have eaten a more balanced diet? Certainly. Could I have pre-made more foods for myself? Of course. In the end, I got through the week, and I don't think I did much damage to my health. The important things for this past week were that I gave my mouth, gums, and jaw a chance to begin the healing process, and I didn't tear any stitches. I think I succeeded in that regard.

Friday, June 21, 2024

Thank you and a lengthy update

To all of you who reached out to me via email this week, THANK YOU! Your words of encouragement and prayers have been a force for healing. I really appreciate that you would take time out of your day to tell me that you're thinking of me, praying for me, or to relate your own surgical and health issues. So again, thank you.  I am sometimes surprised at how kind this group is. And I'm grateful that you sent some of that kindness my direction.

For an update -- as I told those who reached out to me, my surgery was Tuesday morning. It went well. I was awake, using what the surgeon calls conscious sedation. I took medication that made me drowsy (and clumsy, could not walk to the car by myself afterward), but I could respond to questions and ask my own questions. For some folks, this kind of medication causes memory lapses of most of the procedure. Not for me. I remember just about all of it, although at some points a little bit hazily, as if I were in a dream, but not a dream, if you know what I mean. Curiously, I was curious during the whole procedure. My doctor filled me in on everything she was doing, which was extremely interesting. I had watched online videos of the procedure in advance. So to hear about it in progress in my own mouth was fascinating to me.

So, for what I had done -- it's commonly called a sinus lift. There are a few different kinds of sinus lifts. Mine involved surgically lifting the floor of the sinus, by entering through the gums above the tooth line, cutting a window in the bone above and pushing upward, then adding donor bone to the space created. The surgery took 1 hour. They were able to increase my jawbone in that spot threefold. In order to go the dental implant route, I needed much more bone in my jaw to hold a screw. I'm very small-boned and needed a lot of new bone in that area. After the surgery was completed and sutures placed, they took 3-D images and showed me the new bone area. It was perfectly placed and in an appropriate amount. Now, I just have to wait for this donor bone to integrate with my own bone.

I brought Advil and Tylenol in the car with me that morning, along with a bottle of water. Immediately after sitting down in the car, my husband handed me the OTCs and water. By the time we were home, the carbocaine had completely worn off and the pain began to set in. Because of the sedative I took earlier, I was advised to not take the heavy-duty rx pain killer for a few more hours. I don't like the feeling of these heavy-duty pain meds, so I was okay with having some pain while using Tylenol and Advil. I also had to keep ice on my face for 2 days to reduce swelling and help a little with pain. Despite all of the icing, I still swelled up pretty badly. I'm very, very bruised as well. My husband says it looks like someone took a baseball bat to my face. The swelling will gradually go away and so will the bruises. For now, I think I look pretty scary. I'm taking pain meds and antibiotics around the clock, eating a soft diet, and trying not to talk or yawn (both pull on the stitches, causing pain). I have my first follow-up visit this coming Tuesday.

Over the past several months, I went back and forth on what to do about this dental situation. There was really no good choice, just one choice that was slightly better than the rest. However, Tuesday night when I was in so much pain I wanted to cry, but didn't because that crying would just cause more pain, I doubted my choice. I'm still in pain but improving. I pray that the choice I made was the right one for me. I'm limited to what activity I can take part in for the next several days. So I'm counting on my family to take care of the garden, the house, and shopping.

Anyway, thank you so much to those of you who reached out to me, as well as those who kept me in their thoughts and prayers privately. I know that my healing has been prayed for.

Enjoy your weekend!

Thursday, June 13, 2024

Highlights From My Day


This pretty little Limoges porcelain box was on a free pile at a neighbor's yard sale.


Free because the bottom part of the box suffered an accident. Still, I think the box is pretty, and I'm keeping it.


I ran a bunch of errands this morning. My last stop was at Walmart which is right next to Value Village (thrift store). I had been hoping to find a Farberware stockpot to go with the saucepans and skillets that I've thrifted or inherited. This is a previously-owned 8-qt stockpot, a good size for making a large pot of soup for the family. I paid $9-something plus tax. It's in great condition -- no dents. Similar pre-owned Farberware stockpots on Ebay are selling for a minimum of $25 plus shipping. New, the same pot retails for $50 minimum. I made a large pot of lentil and leftover soup for dinner tonight in my new stockpot.

I think my Farberware set is now complete. I love how shiny stainless steel cookware is.


For the last few months I've been taking this OLLY gummy supplement to take the edge off of anxiety. It contains GABA, l-theanine, and lemon balm. It doesn't completely relieve my anxiety, but it allows me to take a step back and rationalize my feelings, bringing about a more calm me. I'm mentioning this here because I think it really does help without overmedicating me. The other night I woke up in a panic again. I took two gummies and was able to go back to sleep shortly. I've also been taking these on mornings I've had stressful appointments and everyday for the past week. 

My surgery is Tuesday morning. I'm doing okay with it. I'm glad I've had all of this time to think through my thoughts and feelings.


Here is my trough of turnips. The leaves are huge, and the roots are now forming. I expect we'll have roots to eat in another 2 weeks if I can keep the trough well-watered.


And finally, our hanging baskets of nasturtiums have just begun flowering. This beauty ended up adding color to our tossed salad with the soup dinner tonight.

How has your week been?

Wednesday, June 12, 2024

My Experience Using a Grow Bag


I don't know if you've ever used a grow bag before. So I thought I'd show you mine. 

This was a gift from a good friend a few years ago. I've had fun trying out different plants each year, seeing what will do well in this type of container.

Last year, I had 1 leftover tomato plant that didn't have a home in the rest of the garden. So I popped it into this bag surrounded by bunches of annual herbs. The tomato plant actually did well and gave us lots of ripe tomatoes. I thought it might be too large of a plant to add to container where root room might be more limited.

The year prior I grew kale, flowers, dill, and more green onions.


This year I've got all of my green onions (those started from seeds as well as those propagated from the root ends of purchased green onions), nasturtiums (to use leaves and blossoms in salads), and a volunteer parsley plant. I'll also add some cilantro seedlings in about a month.

I have my grow bag on the deck next to the kitchen door. I water and fertilize the plants in the bag as I do the rest of the containers on the deck. I initially filled the bag with ordinary potting soil, as potting soil drains easily. It also lightweight than garden soil. So I can move the planted bag by myself when needed. It's still heavy, though. So I only move it when I'm planning on relocating it for the season. Many folks recommend emptying the bag at the end of the season and give it a good cleaning. I have yet to do that, but may give it a go this coming fall. 

I've been pleased with the results so far. I haven't had any issues with bugs or soil fungus, perhaps a result of having my grow bag on the elevated deck and in a very sunny spot. 

The real value to using a grow bag is that you can turn any spot in your yard, patio, or deck into a garden, while still being able to clean it up and fold it away at the end of the season. 

Have you ever tried a grow bag? What did you plant in yours? How would you rate your success?

Tuesday, June 11, 2024

Best Tip for Saving Money on Purchases


The best tip ever for saving money on just about any purchase is to plan ahead.

Planning ahead allows you to:

  • determine what you really need vs. desire
  • compare prices and versions of items
  • find alternate ways to get the same or similar thing, like a little DIY
  • save up for the item
  • and get what you really want


Planning ahead almost always saves money when buying a home, a car, house and garden accoutrements, clothing, groceries, and vacations. 

We began shopping for our house about a year before we actually bought it. We looked at so many houses in so many neighborhoods. That extra year gave us the opportunity to determine the floor plan and size that would work best for our growing family. It also allowed us to save an additional $20,000 to put down, reducing our mortgage and eliminating the need to carry mortgage insurance.

Shopping for our current car followed a similar blueprint. Not only did we search for many months, but we were able to time our purchase to take advantage of the season when previous years' models are being cleared off the lots and the day of the month when dealers are most motivated to make a sale. While we didn't buy a new car, even buying a used car got us a deal because the newest models just arriving in showrooms made our 2-year old car appear to be 3 years older than those new ones. 

When we first married, my husband and I had practically no furniture. We banked the wedding gift money we received instead of going out and buying brand new furnishings. We borrowed furniture from relatives while we planned and shopped for secondhand and clearance pieces to supply our needs. When we didn't find a secondhand dining table that we liked, we looked to kit furniture. By being willing to assemble and finish a table and set of chairs ourselves, we saved our newly married selves a couple hundred dollars. We also were the lucky recipients of many relatives' cast-offs. Some of these hand-me-downs were in decent shape. Others we accepted knowing that we would refinish them. We now have several nice items that once looked really shabby, all because we could see potential. Still, this took time. It would be a couple of years before we could fill an apartment with basic furniture of our own.

Planning ahead for clothing can also be lucrative. Shopping end-of-season clearance sales on clothes can save so much money. I'm especially thinking about buying jackets and coats. You can get a stellar deal buying a winter coat in April to be worn beginning the next November.

We all know that making a list and planning for what you need at the grocery store is a great way to save money. By planning ahead, you don't overbuy and risk some food spoiling. Plus you can shop the different stores in an area to find the best deal. I laugh when I think of my husband's and my first year of grocery shopping together. We typically went shopping after work, before dinner, without a list, and just wandered the aisles trying to find food we'd want to eat for the next week. Our grocery purchases looked so haphazard. Half way through the week I'd need to go back to the store to buy those things we forgot or didn't plan for. It's amazing to think that I was such a poor planner in those early months.

With vacations, the exception to planning ahead as a money-saver is when a consolidator, such as Priceline or Orbitz can net you a cheap hotel room or airfare at the last minute. The rest of the time, it's almost always less expensive to purchase vacation components long in advance. Doing so allows you to take advantage of limited super saver deals and gets you exactly what you want.


You know what made me think about all of this today? Earlier I transplanted my fall marigold seedlings into larger pots. There were 15 plants in all. These will be the flowers that I plant into even larger pots in late August when I'm feeling a little autumnal and wanting some fall colors on the porch and patio. I started these flowers from seeds earlier this spring with the plan to spotlight them in fall. By planning ahead, I got the flowers and colors that I desired and saved a bundle over buying individual pots of flowering plants from the nursery. If I give the marigolds good care these next two months, I should have enough plants for 6 to 8 large pots of flowers for pennies, mere pennies.

What are some other areas of spending that you think planning ahead can save substantial money? What exceptions to this "rule" can you think of?

Monday, June 10, 2024

Quick Makeover for a Couple of Porch Accessories


Once again, spray paint to the rescue. A couple of items on our front porch had a distressed finish, a Welcome sign and a pair of wall trough planters. This was fine for the look I was going for before, but now I wanted a cleaner look. 

What I love about spray paint is that if I decide to go back to a distressed look at a later date, I can do that with spray paint, too. But for today, I decided I wanted the three items painted black.


The Welcome sign was easy. I simply took it down and sprayed it on a sheet of cardboard. Once dried, I rehung it, moving it up on the wall about 6 inches, so it wasn't part on white, part on gray.


The wall troughs were a bit more involved. I could only unscrew one out of four screws. My husband wasn't home, and I wanted to get this done that morning. 


So I decided to spray paint them while still attached to the wall. 


I used paper, cardboard and duct tape to cover all of the wall and floor that could get sprayed. And I used another large sheet of cardboard to deflect paint from the wall and floor beyond the taped paper/cardboard. I held the deflecting cardboard in one hand while spraying with the other. This worked out really well. The more difficult part of painting the troughs was ensuring there were no gaps in paper/cardboard coverage. The spraying itself went quickly. After I pulled the paper off the wall, I found one small smudge of black paint on the white brick. I used some white acrylic paint to cover that bit.

So here are the end results.

the Welcome sign

the wall troughs

I used the Rustoleum 2 X spray paint in Canyon Black, satin finish on all three. I finished and cleaned everything up before lunchtime on Friday. So this was a quick project, in my opinion.

I'm super happy with how they turned out. They're not perfect. But my new saying is this -- good enough is downright fabulous. Love the look.


I need to get some coir trough liners for both of the planters, then fill them. I'm getting close to finishing this project.

Thursday, June 6, 2024

Decorative Paper Party Napkins for a Fraction of Original Cost


I love using decorative paper napkins for celebrations. But I don't love their retail prices. So in spring and summer I check neighborhood garage sales for unopened packages of these fancy napkins. I will pay up to 50 cents for an unopened package, but also find them priced at 25 cents. I only buy what I truly love and will use in the next year or two, which usually means I will buy 3 or 4 packages each garage sale season.

I found these really pretty napkins, above, in pink and blue with a hydrangea pattern and this other lovely floral border pattern with the black accents for 50 cents a package, unopened, at a neighbor's garage sale in early May. 


These Christmas napkins were just 25 cents for an unopened package, found at another garage sale a different weekend.

The hydrangea napkins were originally priced at $3.00, and the black border napkins were originally $5.00. The price sticker on the Peace Christmas napkins has been removed.

We used the hydrangea napkins for our Mother's Day brunch and plan on using the black floral border napkins for Father's Day. It's probably obvious that the Peace napkins will be used at Christmastime.

I imagine some folks buy these napkins at retail, expecting to use them some time and then forget or have too many others to use. Or perhaps they received them as a hostess or other small gift. In any case, I get to be the lucky beneficiary of their paper napkin abundance.

Getting my pretties without breaking the bank.

Wednesday, June 5, 2024

Saving Hundreds of Dollars on Our Homeowner's Insurance Policy

We replaced the roof on our home last month. This morning, I called the insurance agent and inquired about an adjustment to our homeowner's insurance premium (due in just a couple of weeks) because of this new roof. 

I needed to submit proof of the new roof. So I went downtown to bring the required paperwork. The agent contacted a central office while I waited. She will be able to give me a final dollar amount of savings for this year's renewal in a day or two. 

Replacing an aging roof with a new one can save anywhere from 5% to 35% off of one's homeowner's premium. In my case, we went from a cedar shake roof to an asphalt roof. Wood roofs are typically more expensive to insure than asphalt. I'm hoping for a sizable reduction.

While I was with the agent, we discussed increasing our deductible. A higher deductible suits my husband's and my style of dealing with insurance. We tend to pay out-of-pocket for smaller repairs and not deal with the insurer, whether for our home or car. We save our insurance for catastrophic loss. So, we increased our deductible amount. That right there will save us a few hundred dollars per year. The caveat -- with a higher deductible, we are assuming a larger share of the risk of loss with our home than previously. But we are fine with that. In the 29 years that we've lived in this house we've only used our homeowner's policy once.

With insurance rates skyrocketing in our area, any savings is very appreciated.

Tuesday, June 4, 2024

Wins and Losses in the Kitchen This Week

In the loss category:

  • about 1 1/2 cups of leftover refried beans that sat for too long in the fridge
  • the liquid from canned beets (good intentions to use it) that developed mold on the surface
  • some two-year old natural peanut butter that was in a container that was pushed to the back of the fridge, with some mold along the edges -- yuk!
  • a container of cornmeal that had bugs. This was gross beyond belief to see those crawly things in the cornmeal. I composted this. Lesson learned -- if I'm not in a cornbread-baking period, keep the cornmeal frozen.

In the win category:
  • a rhubarb and blackberry crisp that I made last Friday, and that no one liked -- so, I cooked it up in portions throughout the week by adding water and microwaving it. It turned into a pretty good rhubarb and blackberry oatmeal breakfast for me. No one else wanted to try this. So I guess, lucky me!
  • the last chunk of a 2 1/2 week old watermelon. The tip of the chunk had gone soft, but the rest was delicious. I had this with my lunch today.
  • 3-day old gravy from a pot roast. It's only about 1/2 cup. When I found it in the fridge on day three, I popped it into the freezer. Then tonight I added it to our vegetable beef soup.

In the part win, part loss category:

  • about an inch off of a cucumber that went soft and slimy. My daughter cut off that part and used the rest.
  • the fatty bits from a pot roast that I made last week. I had intended to render the fat into liquid beef fat to use in cooking. I didn't get to it, but my husband did. He did use the liquid fat in a meal he made for us, then he ate all of the cracklin' bits. I regard this part of it as maybe a loss, as he wound up with a pretty bad stomachache the next morning.
So what have been your losses and wins in the kitchen lately?

Monday, June 3, 2024

Latest Up-cycle Outdoor Furniture Project

I have surgery scheduled for 2 weeks from tomorrow. So, I'm working hard to get my many projects wrapped up well beforehand, as I won't be able to do this sort of work for several weeks afterward. And I want these things finished. 

This may be interesting to you, I was reading about anxiety concerning surgical procedures and women. Women tend to feel more like they need to get everything set in place exactly how they want before surgery, whereas men don't have that same sort of feeling. Anyway, I've been having some serious panic attacks regarding my own surgery. It's not a major surgery, but I'm very anxious nonetheless. I've been waking in the middle of the night feeling panicked for the last few nights. 

Despite this stuff, I wanted to share my latest project. This time I've managed to coerce some help with parts of it.


The thrifted chairs I redid last summer just didn't thrill me. The wood seat didn't weather very well. I knew I'd need to redo the seats. But then I had another thought. What if I put the two chairs together side by side and turned them into a bench? I've seen lots of DIY chair benches online. I think they're a great alternative to a pricey new bench for the patio.


What I'm working with:

  • 2 metal frame chairs
  • used primed and painted cedar fence pickets
  • used screws
  • wood putty
  • spray paint
As mentioned, I had the chairs from last year (thrifted for $5 each). The fence pickets were from a courtyard that was walled-in 16 years ago. We saved the fence panels to reuse in future projects. The screws my husband had rescued from something or another. I had the wood putty from last year. I bought a new can of black spray paint. So this year's cost will be about $7 for the bench, or under $20 if I include the cost of last year's chairs.

My husband and I have been working on this for a couple of weeks. We don't have instructions, instead are coming up with how to do this as we go.


I took the wood seats off of the metal frames, then went out to the yard with my husband to get a few fence pickets. We cleaned up the fence pickets and gave a quick sanding in spots. But mostly left the primer and paint in tact. At this point we laid the pickets out on top of the bare chair frames to see how many we should use and what the spacing between each should be. 

We don't have very sophisticated power tools, just a drill, a sander, and a jig saw. This is where my husband's help was indispensable. We needed to cut the pickets down a few inches. I tried to use the jig saw freehand. But I'm just not strong enough to keep it steady. My husband cut the rest of the pickets to length for us. We then drilled the screw holes in the seat pickets as well as some bracing pickets to hold them all together.


I puttied the old holes (from when the pickets were attached to the fence), gave them a good sanding, and painted the edges. Once that paint was dry, I attached the seat pickets to the bracing pickets, leaving a super narrow gap between each slat.

Where we are right now. The seat is assembled. I've put a light coat of spray paint on the top of the seat (not seen in this photo). I need my husband's help with the next step, cutting 4 small notches in the back slat to fit the seat around some raised metal tubing at the rear of the chairs-turned-bench. Once we get that sorted, I'll thoroughly paint the entire picket bench seat and attach it to the chairs. There are metal screw holes where the chair pads attached to the chair frames. 

Our process is we work a little on the bench, then take a couple of days off to think through the next step or redo a part with which we're unsatisfied. So this is a slow process.

When finished, the entire bench will be painted black. I'm hoping once the seat is black, it will look cohesive. I already have a spot for the new bench. There's a patio adjacent to the front porch that I spruced up this spring. I'm planning on setting the new bench on that patio.

In case you're interested, here are some other DIY chair benches that I found online.


Thursday, May 30, 2024

Using Netted Produce Bags in My Flower Pots


I save the large netted produce bags in which onions and sometimes oranges come packaged. I set them aside in my gardening cupboard and use them as I find need. I've used them to create a barrier at soil level in pots to prevent squirrels from digging up tulip bulbs. I've used them for making gigantic tea bags to make compost tea. And today I use one large bag to make screens for the bottoms of my two flower pots for the front porch. 


When my pots have single large drainage holes I like to use some sort of screen to prevent soil from washing through the drainage holes after watering. A screen covers the hole, holding in soil, while allowing excess water to pass through. A screen will also discourage many insects from taking up residence in my plant's pot.


Plastic mesh screens, cut to fit the bottom of flower pots, can be bought from Amazon for about 30 to 50 cents each. By folding a section of a netted onion bag, fourfold, I can create a screen that has fairly small holes and is effective at holding in the soil.


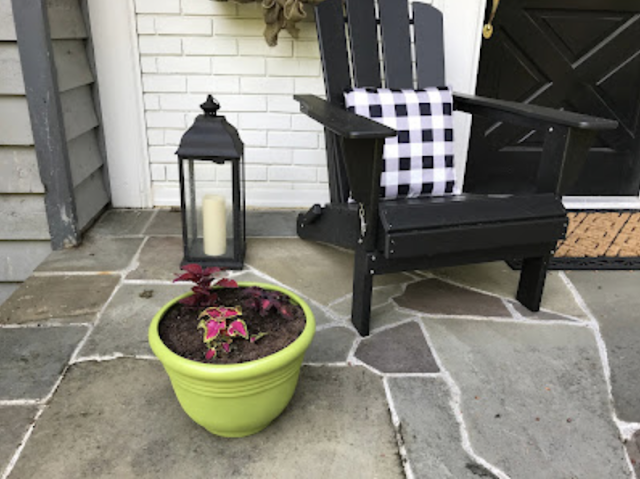
This afternoon I potted my "new" green pots with fresh potting soil and a trio of coleus plants. I filled the pots on the deck right outside the kitchen door (in the pathway to get in and out of the house). 

I laid the folded over netting on the bottom of the pot , covering the hole, and held it in place while I began scooping soil into the pot. When the netting was covered, I poured in the rest of the soil to fill the pot. After planting the coleus, I moved the pots from the deck to the front porch. The deck where the pot had been sitting while filling was clean, no little circle of potting soil under the pot's drainage hole. The netting prevented soil from leaking through the hole.


I watered the two newly planted pots once moved to the front porch. An hour after watering I checked under the pots to see how much dirt or dirty water seeped through the netting-covered drainage hole. While it was clear that water had drained through the hole, running down the slope of the porch, and there were drips of water still under the pot, no dirt was on the paving. 

I wish I'd gotten to planting these pots last month. I hope my small plants grow quickly. But I can only do what I can only do.

Wednesday, May 29, 2024

Growing Food for Free

Although I buy seeds for most of my vegetable gardening, here are two foods that I'm growing for free this year. This is truly free food. I use parts of foods that I've purchased in spring that are deemed waste, such as inedible seeds or root ends. I plant these bits into ordinary garden or yard soil mixed with home-made compost. 


Green Onions

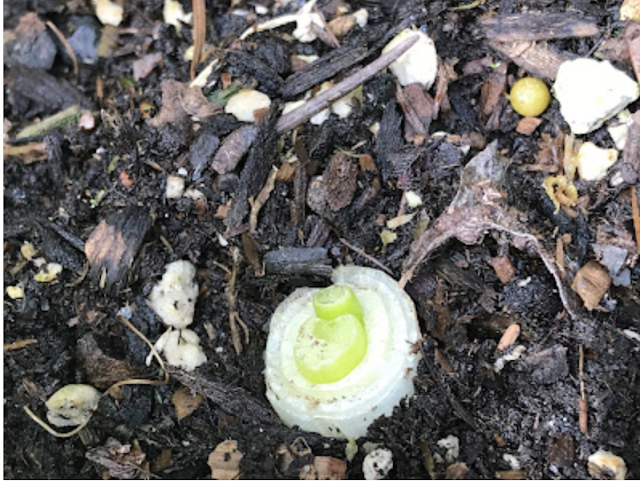
As I've been using grocery store green onions this spring, I've cut off about 1 inch of the root end and popped that part into some soil in a planter just outside the kitchen door. I didn't do anything special with the onion ends, just made sure the roots were intact and there was enough of the onion part (about 1 inch) to regrow. I can now see they are beginning to push up some new green growth from the root ends. I hope to have green onions for cutting in about a month.

Some folks prefer to start their green onion ends in water. I've had success planting directly into soil, provided it's kept watered (not a problem in our rainy spring weather) and likelihood of frost has passed.

What I like about growing green onions from the root end of purchased onions is that I would have otherwise just composted that root end. So I'm using a part that is basically a waste product from the green onions. In addition, you can begin harvesting from these green onions that were grown from roots in about 6 weeks after planting. Which means, I can be planting onion roots way up until early August and still have time to harvest some green tops before our weather changes in fall.


Bell Peppers

I have 6 pots of bell peppers (2 plants per pot) that I started from the seeds from a grocery store red bell pepper. As many of my neighbors do, I'm growing these plants in black pots in a very sunny spot of our yard. The seeds were free. We had the pots already. And the soil is a mixture of the soil from our yard and home-made compost. My experience with growing peppers from saved seeds from grocery store red peppers has been fair in the past. At the lesser end of harvest, I've gotten 1 or 2 small green peppers per plant. At the greater end, I've harvested 2 medium green to red peppers per plant. In all cases, the plants have been free, and I've grown them in soil from our yard/garden. If I get just one pepper from each plant, that will still be 12 free peppers for our meals or adding to homemade pickle relish.

What I like about growing peppers from the seeds collected from store-bought red peppers is this is totally free. I don't use the pepper seeds for any cooking purpose. I would otherwise add the seeds to the compost. And since it's a totally free endeavor, I'm willing to take a chance on the plants not producing as well as if I'd purchased seeds that were designed for my area. Because this is what I'd call risky gardening, I am unwilling to use purchased soil for these pots. But I will give them several drinks of my free compost tea this summer. Keeping my fingers crossed that this is one of the better years for my peppers.


~~~~~~~~~~~~~~~~~~~~~~~~~~~~~~~~~~~~~~~~~~
Be a voice that helps someone else on their frugal living journey

Are you interested in writing for creative savv?
What's your frugal story?

Do you have a favorite frugal recipe, special insight, DIY project, or tips that could make frugal living more do-able for someone else?

Creative savv is seeking new voices.


~~~~~~~~~~~~~~~~~~~~~~~~~~~~~~~~~~~~~~~~~~~~~~

share this post