Last year I showed you a rudimentary rabbit fence we made from sticks and wire. This actually worked well to keep the rabbits and squirrels out of the strawberry beds. However, it was time-consuming to install.
Pros to the stick fence: free and if you place the sticks close enough, a good barrier against small animals. If you have an abundant supply of small branches, this can be made on the spur of the moment -- no need to order supplies or visit the hardware store.
Cons to the stick fence: it's time consuming to break all of the sticks and poke them into the ground. I spent a couple of hours making just one fence.
 |
| Hard to see -- there is a fence of chicken wire around the near bed. |
We also have 2 beds enclosed with chicken wire fencing. While this is very effective at keeping critters out of beds, it rusts.
Pros to chicken wire fence: very effective at keeping all of the small critters that do damage out of the bed. Chicken wire is thin and easy to bend to fit a bed. Compared to other fencing materials, chicken wire is fairly inexpensive.
Cons to chicken wire fencing: it rusts, as I said above. It can bend out of shape and not look as tidy.
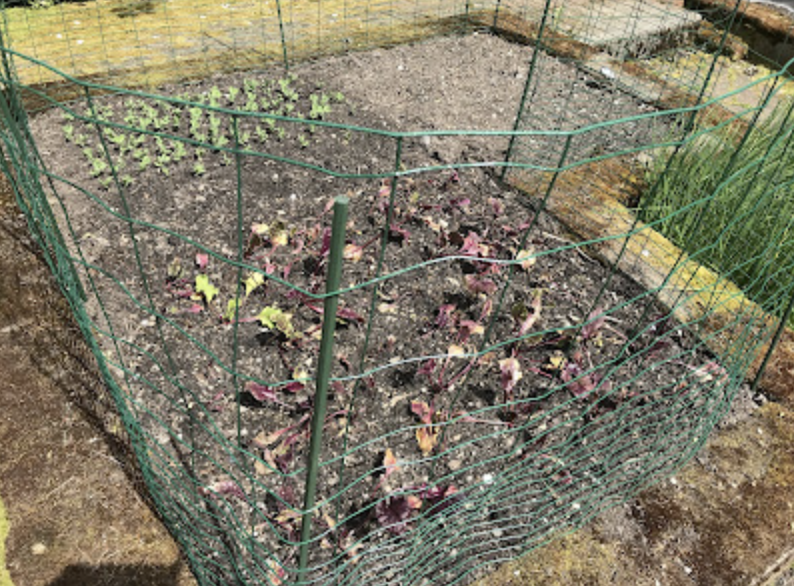
I wanted something more lasting for garden bed fencing for the remaining beds, so I ordered some coated, heavier wire animal fencing (about 28 inches high) and plastic-coated stakes. I've surrounded 2 of our garden beds so far with these new supplies. It's a hard job for one person (I did one by myself), but more do-able with a partner (got help on this other one). The wire is stiff, which is hopefully a sign that it will be durable and lasting. But the wire fencing comes on a roll that does not want to unroll, hence the need for a partner. The spaces between wires are close together near ground level, meaning animals can't crawl through near the ground. The spaces get larger toward the top. In theory, one could r4each through these wider spaces to pick something. But I think it's just as easy to bend over the top of the fence, as it's not that tall, (but tall enough to keep most animals out). The fencing was mostly easy to cut with wire cutters to make my fencing to size with the bed. The top and bottom wires are thicker and more difficult to snip. I'm pleased with how it looks so far. We'll see how it holds up over the season.
Pros of the heavier wire critter fencing: it's very sturdy and is coated in plastic, so it will hopefully last a long while. While I prefer a "no fence" look, as far as garden fencing goes, this one is fairly attractive, at least it's tidy looking.
Cons of heavier wire fencing: it doesn't want to stay unrolled while working with it. You really need a second person to hold the fencing at one end while the first person unrolls and works the stakes in. It's also more expensive than chicken wire.
We're working harder at keeping the critters out of our vegetables and berries. It's so frustrating to plan on a harvest only to have half of it devoured by the animals. Hence more beds fenced in this season.

I also thought I'd show you what a water-permeable insect barrier cloth looks like. Unless you spray these plants, cabbage family vegetables are plagued with cabbage worms year after year. I can rub these small green worms off of kale and turnips, but they get into cabbages, Brussel sprouts, broccoli, and cauliflower. Right now I've got a piece of the fabric over the cabbage and Brussel sprout seedlings. Some folks use earth staples to hold this cloth in place. I've anchored the edges down with stones instead (I don't want to poke holes into it) and pleated the center of the cloth by folding it at the ends and placing stones over the folds. This will allow for growth of the plants for a few weeks. For the time being, insect cloth is keeping both the rabbits and cabbage moths off of these plants. This bed has a chicken wire fence that I'll put up after I redo the insect barrier cloth. As the plants grow, I'll need to adjust the fabric to fit taller plants, turning the lengths sideways and adding additional panels. If you're careful with insect cloth, it will last a few seasons. I've used these pieces on a few different patches over the last 2 years. This year I noticed a couple of small holes, but overall I think it will do an adequate job.

I'm also using the top 2/3 of plastic milk jugs to protect some plants from the bunnies. I saved these homemade cloches from last year's garden, so they were not only free, money-wise, but time-wise as well this year. Right now I have them over the celery transplants until I can get some fencing around this bed, hopefully in a couple of weeks.
Our garden is comprised of 15 raised beds. We have wet springs and soggy soils. The raised beds mean I can plant earlier than if our garden was at ground level. But 15 beds is a lot to try and enclose. Up until the bunnies arrived 3 years ago, our critter problems were not overwhelming. Squirrels weren't interested in most of what I grow. Raccoons only occasionally got into the veggies. They're mostly interested in the fruit trees and corn plants. And the birds limit themselves to the cherries and blueberries. With the addition of rabbits, it seems that all of our garden is now at risk.
If, as the saying goes, that good fences make good neighbors, how do you suppose the critters will feel about the people of this garden?