Stay Connected

Friday, July 9, 2021

Rosemary Lentils


I make a large batch of rosemary lentils at the beginning of the week and have them cold for my lunches all week long. On top of that, I also occasionally make them for my family for dinner. I mentioned this dish the other day in a post and was requested more information. It makes a great summer dish -- it's easy, fresh, and can be made in the morning (while the house is still cool) and served in the evening.

Rosemary Lentils (serves 4)

1 cup dry lentils, rinsed
3 cups water
20 4-inch springs fresh rosemary (should yield about 1/3 cup minced), more if you really like rosemary -- up to 30 sprigs or 1/2 cup minced
1 large clove garlic minced, or 1/2 teaspoon garlic powder
1/3 teaspoon salt
dash black pepper
1/4 cup olive oil
1 tablespoon lemon juice (bottled is okay)
1 tablespoon good vinegar (flavor-infused vinegar or wine vinegar)

Place rinsed lentils and water in a medium saucepan. Bring to a boil. Reduce heat, cover. Simmer for 25 to 30 minutes, until soft but hold their shape. Drain off any excess water. Rinse gently and drain again.

While lentils cook, strip the leaves off of the rosemary stems, leaving the tender top inch of each stem with the leaves. Discard the long stems. Chop leaves fine. 

In a large bowl, toss the cooked lentils with chopped rosemary, garlic, salt, pepper, olive oil, lemon juice, and vinegar. Adjust seasonings. 

Serve warm or cold over salad greens or as a sandwich stuffed in pocket bread.


notes on the recipe

My family loves the flavor of rosemary, so I use the greater amount (30 springs). I don't think it's too heavy at all. However, if you're unsure how much rosemary you might like, try the lesser amount to start, toss with lentils, then add more if you want at that point. With the salt, if you normally eat less salt, try 1/4 teaspoon to begin, then add a sprinkle more if you think you'd enjoy more salt. You could use vegetable oil, but I do think that olive oil really adds to the overall flavor. I buy olive oil in large, restaurant supply jugs. I keep most of it in its original jug in the refrigerator, keeping a month's worth in a small, dark glass bottle in the pantry for convenience. I've been using this same large jug of olive oil for almost two years. I'm at the bottom of the jug and the flavor is still very good. Olive oil deteriorates when exposed to light or prolonged warmth. So I believe that storing the bulk of it in the fridge has been beneficial for the oil.


health benefits of rosemary

I love the flavor of rosemary. But I also love the health benefits. 

  • Rosemary is believed to slow cancer cell growth and possibly inhibit tumor formation. 
  • Rosemary may boost the immune system. The acids in rosemary work as antibacterial, anti-fungal, and antiviral agents. 
  • Rosemary also has anti-inflammatory properties and may help reduce some chronic pain, such as with RA.


Thursday, July 8, 2021

Normalizing a Waste-Nothing Mindset

There is nothing sensational about this photo's subject matter to other frugal warriors. It's half of a banana and a large bite of cornbread under a glass bowl sitting on my placemat. I eventually ate the cornbread bite as a pre-dinner snack yesterday and the half-banana will be used in tomorrow's smoothie.

Our whole family does this all of the time. If we can't finish what we've started, we refrigerate perishables or leave less perishable remnants at our places at the table.

When my son was a small boy, any leftovers from meals were reincarnated into his next meal's offerings. So, a partially eaten apple might become a personal mini-microwaved apple crisp, while a couple of bites of meatloaf might be reheated and served with toast for breakfast the next morning. Even a partial glass of milk became cocoa for breakfast or a "milkshake" with lunch. My kids simply grew up with this, so it never seemed yucky or strange to them. 

Both my husband and I grew up in never-waste families. Part of that was due to the times, and part was due to a lot of mouths to feed in my husband's family. (At one point, both grandmas lived with the family of 5 children.)

We try to be careful not to over-serve ourselves, but sometimes even our adult eyes are too big for our stomachs. We just try to not let those occasions become a source of waste. Anyway, I know that you all do some rendition of preventing wasted food similar to this. Every once in a while, I just like to say that part of frugality out loud. Non-frugal folks might not understand, perhaps thinking it better to throw out food remnants than to have them hanging around for a few hours or a day. But you all get it, right? It simply makes me feel better about our stewardship of our tiny sliver of the world's food supply.

Wednesday, July 7, 2021

This Week on the Farm

a lunch mostly from the garden

I know, it's just a backyard garden. Sometimes, though, it does feel a bit like I'm a farmer. Here's what I've been harvesting this week:

garlic scapes to saute with greens

assorted cooking greens

assorted salad greens

rosemary for a lentil salad

lots and lots of cherries right now

the tale end of the strawberry season

raspberries just beginning to ripen

black currants for a syrup
 to flavor tea or lemonade


Every morning, I check what is ready to harvest and then pick as much as I think we can eat for the day or I want to put away for winter. The cherries are abundant, so I'm picking however much I feel like pitting to dehydrate. Harvesting is the reward for hours of planting, pruning, weeding, and watering. And when I can make a lunch like we had yesterday, with salad greens, cherries, raspberries, strawberries, pickled figs, and rosemary lentils, I know the work is all worth it.

I hope your week is off to a great start!


Tuesday, July 6, 2021

Busy, Busy Weekend

Three-day weekends keep me hopping. I hope your week is off to a grand start. I'll be back with a new post tomorrow. Have  a great day!

Monday, July 5, 2021

4th of July Ice Cubes


Most of my holiday stuff has been purchased after the holiday, on clearance. A couple of years ago after the 4th of July, I found this star-shaped silicon ice cube tray on clearance at Michael's Crafts for about $1. I forgot to use it last year. 


The other day I got it out and began making star cubes. Such a fun little thing to make our holiday feel festive.


After I'd made a nice pile of star ice cubes, I used the mold to make some white gelatin stars for the top of our red, white, and blue jello salad.


For those interested in how my Kool-Aid jello salad turned out, here's a photo. This was a collaboration between one daughter and me. She really wanted to have white cake inside the jello, making this more of a dessert. I said that if she wanted cake in it, she would have to bake the cake. 

So, what you're seeing on the side is a cake layer that is partly beneath the blue jello and blueberry layer, then topped with a red jello and strawberry layer. The cake actually "floated" up when I poured the jello onto it. Originally, I place the cake at the bottom of the soufflé dish.

For your information, the ice cubes popped out of the mold a lot easier than the jello cubes. But it all turned out okay, anyway.

Friday, July 2, 2021

A Patriotic Salad for the 4th of July

4th of July Jello salad from 2 years ago

I went to WinCo yesterday to do some grocery shopping and pick up a few items for the 4th of July cook-out. On my shopping list was 1 package of red jello and 1 package of blue jello, hoping for store brands. My plan is to make a red, white, and blue jello salad for the 4th (using whipping cream for the white layer). Well, they had small boxes of store brand cherry jello for 47 cents each (not too bad), but only Jello brand blue jello (Berry Blue) in the big boxes at $1.53 per box (more than I wanted to spend). 

I thought about buying both, then I happened to pass the Kool-Aid display. Kool-Aid was priced at 18 cents a packet and there are both red flavors and blue flavors. So, using my plain gelatin (that I already have), my own sugar, and the Kool-Aid packets, I'll be making my own red and blue gelatin for my 4th of July salad.

I wanted to cost this out so I could compare making my own to the boxes of flavored gelatin. I have plain gelatin that I purchased in a large container a couple of years ago. But if I had to buy unflavored gelatin, Walmart sells a 4-pack of unflavored gelatin for 89 cents. Each packet makes 2 cups of set liquid, the same amount as the small boxes of flavored gelatin desserts. The unflavored gelatin part, then, would cost 22 cents.  Most online recipes call for 1/2 cup of sugar to sweeten 2 cups of gelatin. So, my 1/2 cup sugar will cost about 8 or 9 cents. The same recipes suggest using 1/2 of a Kool-Aid packet to make 2 cups of flavored gelatin. 1/2 packet would cost me 9 cents. I may go over the 1/2 packet to get a stronger flavor, so I'll round that up to about 12 cents. (I'll make popsicles out of the rest of the Kool-Aid packet.) My total cost for making my own flavored jello that is equivalent to the small box at the store, then is about 42 or 43 cents, about 5 cents less than the store brand small boxes. That doesn't sound like much of a savings. But wait, the real savings is in making flavors/colors that are only available in the name brand, such as the blue Jello. WinCo only sold the large boxes of Berry Blue Jello (sets 4 cups of liquid). In theory, I could make an equivalent amount of blue jello using Kool-Aid, gelatin, sugar for 84 to 86 cents. That's 67 to 69 cents less than Jello brand at WinCo. I guess what I'm saying is that if you're after an unusual flavor or color of jello that is only carried by the more expensive name brand, then making it from Kool-Aid, sugar, and unflavored gelatin is a saver. 

I checked a couple of other stores online for Berry Blue Jello, to compare cost. I found it at Walmart for $1.22 for the big box and 98 cents in the small box. Making my own blue jello with Kool-Aid will still save me 36 to 38 cents over Walmart's cost for the large box or 55 to 56 cents for the small box.

I would have spent $2.00 at WinCo on boxed gelatin mixes. Instead, by buying Kool-Aid packets and using my own sugar and gelatin, I spent about 84 cents for the red and blue portions of my red, white, and blue gelatin salad. 

Wishing you a happy 4th!


Thursday, July 1, 2021

June Grocery Recap

I shopped mid-month at WinCo and spent $46.31

I also put in a split order with Walmart, one to be delivered and one for pick-up, in order to get some items at best prices. Total spent on food (peanut butter, raisins, honey, sorbet -- $55.63. About a week later, I checked the Walmart website to see if the peanut butter was still on sale (works out to $1.08/lb, has since been marked up to $1.44/lb). It was, so I ordered 6 more large jars. Sounds crazy, but when I checked the price again just now (at the $1.44/lb price) and saw how much I saved, I felt vindicated in my total "crazy" purchases of 12 64-oz jars. Spent on food -- $26.04. To get to the $35 minimum spend threshold for free shipping, I added 3 boxes of automatic dishwasher detergent, same brand and price I would spend at my local Walmart. Since P&G has already announced increases in prices across the board on their products this coming fall, I expect detergents and other household products to go up in price. I now have a few spare boxes of dish detergent.

I really thought I'd go shopping for groceries again this month. I never got around to it. And our supplies at home are holding out, so no need. Total spent this month -- $127.98

My "fail" in ordering groceries was the raisins. I didn't check to see what I paid per pound at WinCo before ordering from Walmart.com. I wound up spending an extra 51 cents, total, on those 4 canisters of raisins. Oh well, that's not a huge mistake. I did save $17.28, total, on the peanut butter.


What I bought

1 head cabbage, (WinCo) 68 cents/lb
bulk raisins (WinCo) $2.25/lb
bulk banana chips (WinCo) $2.18/lb
dried apricots (WinCo) $3.01/lb
1 bundle celery (WinCo) 98 cents
5-lb bag carrots (WinCo) $2.48
bananas (WinCo) 40 cents/lb
4 20-oz canisters raisins (Walmart.com) $2.94 ea

12 large jars (64-oz) of peanut butter (Walmart.com) $4.34 ea
2 32-oz bottles raw honey (Walmart) $7.93 ea

red, white, and blue sorbet -- daughter's request (Walmart) $1.97

18-ct eggs (WinCo), $1.70
5 gallons milk (WinCo), 2@$2.40, 3@$2.49

Father's Day
2 bags frozen oven-roasting vegetables (WinCo), $2.64 ea
large bag broccoli slaw (WinCo) $2.98
vanilla ice cream (WinCo), $2.68
2-liter Root Beer (WinCo) 98 cents
refrigerator cinnamon rolls (WinCo) 88 cents  
bulk cashews (WinCo) $4.98/lb
hamburger buns (WinCo) 85 cents  

At my first shop at WinCo, I would have spent more. However, WinCo is a cash or debit only store and I forgot to grab extra cash before leaving the house. I was in the bulk section when I realized this and quickly pulled out my wallet to count my available cash. Not enough. So, I drastically reduced my shopping list at that point, while still buying what I'd need for Father's Day.

Monthly food spending for last 11 months

Aug 2020   $92.18

Sept 2020  $182.30

Oct 2020   $304.52

Nov  2020  $189.45

Dec  2020  $77.98

Jan  2021  $54.07

Feb  2021  $184.66

Mar 2021   $152.77

Apr 2021  $447.19

May 2021  $285.53

June 2021 $127.98


$190.78 average for last 11 months, including June 2021.


And now, it's the beginning of another month.


Wednesday, June 30, 2021

Email Subscriptions Ending

I mentioned this at the bottom of a post last week. In case you missed it, this may be the last email post you receive from me. I kept meaning to send this out and just kept putting it off/forgetting. Anyway, I'm still here posting every weekday. You may have to bookmark creativesavv.com, subscribe through Bloglovin' or just check when you're interested.

FYI -- this is not of my choosing. Google/Feedburner is discontinuing the email delivery service and I haven't been able to replace it yet. When I have a new email subscription service, subscribers will need to resubscribe. I'll make an announcement at that time and place the subscription button prominently on the page.

I'm really sorry about any inconvenience this causes you and hope you'll still find a way to connect with us, here.

Thank you for reading and being a member of this community.

Sincerely,

Lili Mounce

Hot Weather Cooking: Using a Thermos


So, back story a bit -- late last week, we could see that the coming Saturday, Sunday, and Monday were going to be terribly hot. And we don't have A/C or any other significant way to cool our meagerly insulated home, just a couple of table fans. So, every extra bit of heat added to our house on an already hot day makes us miserable. We decided that we wouldn't use the stove, oven, or even crockpot for the three hot days to come. This drove me to find alternative ways to cook. 

Obviously, the microwave is a great way to cook without heating the house. But I was also interested in finding other ways to cook. That's when I stumbled upon the idea of using a thermos to "cook" grains. I cooked both rice and oatmeal in a wide-mouth thermos.

To cook rice in a thermos, you need to parboil the rice and water for 5 minutes prior to putting it into a preheated thermos. (To preheat a thermos, boil a cup of water in the microwave and put into thermos then cap.) So, I used the microwave on reduced power (40%) for 5 minutes to cook the rice, water, and salt. After 5 minutes, I poured the preheating water out and rice, water, salt mixture into a thermos then allowed it to stand for an hour and a half. Afterward, I had cooked rice. I tried this with white rice, because it takes less time to cook in general. I haven't tried this with brown rice, but I did read that you can cook brown rice in a thermos this same way.

I also wanted to make some oatmeal to have for breakfast the next morning as we were low on other breakfast options. This time, I didn't bother preheating the thermos. For each serving, I boiled 2/3 cup of water in the microwave. I measured 1/3 cup of regular rolled oats and pinch of salt for each serving and put into the empty thermos, then poured the boiled water on top and sealed with the lid. I left this on the counter overnight and by morning, I had completely cooked oatmeal.

The "value" in using my thermos to cook grains was not just in keeping the kitchen cooler. But also, with the oatmeal in particular, my experiments showed me a way to "cook" food in a power outage or off the grid. I can usually find a way to boil water even without power, using Sterno, a grouping of candles under a pan (in a safe space, like inside my oven), the outdoor grill, or the evening fire pit while camping. 

Cooking the oatmeal in a thermos gave me an idea that I'll follow up on -- adding mix-ins to the oats and water the evening before. This could be a fun way for my family members to make their own customized oatmeal while camping or staying in a hotel. Everyone gets their own thermos and chooses from mix-ins like dried fruit, chocolate chips, chopped nuts/seeds, cinnamon, and brown sugar.

Tuesday, June 29, 2021

Tweaks to My Car Baking: Making Flatbread and Better Cookies


So, on Monday I tweaked both the cookies and the bread and was pretty happy with the results. I wanted to share in case any one else is crazy enough to try this.


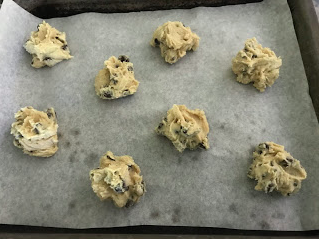
For the cookies, I added extra flour to make the dough slightly stiffer than I would for oven baked cookies. My car made it up to 180 degrees F at the highest, which means that the cookie dough was melting and spreading before the crust could form. By adding just a bit more flour, the dough held it's shape better. 


The other tweak to the cookies is I greased the parchment paper before adding the dough. This made removing the cookies easier after they were baked. There's something about baking at a lower temperature that made the cookies stick to the parchment more than usual. Anyway, those were my tweaks for the cookies.


For the bread, on Monday I made flat bread using a French bread dough. I rolled the dough out into circles, using a rolling pin and placed on a greased baking sheet. I didn't allow the dough to rise because I was running late and needed to get it into the oven car. 


Despite this, the bread came out pretty good, not doughy like the last loaf. So, what I learned is that it's possible to bake a yeast bread in a hot car if you make it flatbread.

Are there any realistic practical applications to what I learned these last few days? I think the most valuable aspect of this was stretching the way I thought about something that was ordinary, baking cookies and bread. I may not ever "need" to bake with my car in the future. However, I now know that there may be other ways I can bake in an emergency.


Monday, June 28, 2021

Baking Cookies in a Hot Car

How crazy is this? I used my car to bake a giant cookie and small loaf of bread on Saturday and a batch of smaller cookies and a loaf of bread on Sunday.

We're experiencing a heat wave in the PNW right now. Our house has stayed around 75 to 80 degrees F downstairs and upper 80s to low 90s upstairs. Our home is older and does not have A/C. As may be obvious, we're avoiding heating the kitchen at all. The heat should break overnight tonight. So, we mostly consider this a bit of something interesting with a little unpleasantness.

A combination of wanting some cookies, a super hot day, and mere curiosity got me to thinking about how I could harness the sun's heat to do a little baking outside. 

I tried to heat a dutch oven in the sun on our deck but it "only" got up to 135 degrees F inside. I went out to the front yard and checked the temp on the black driveway, but it wasn't any hotter. My daughters were washing the car for me, so I slipped the oven thermometer inside on the dashboard. It quickly rose to 165 degrees F, leaving me to think this might be the place to bake. Ultimately, the car's interior heated up to 175 degrees F on Saturday and 180 degrees F on Sunday.

I placed a potholder on the dash (so as not to do any damage from a heated metal pan), then place the pan of cookie dough on top. I left it all there for a little over 2 3/4 hours, from just after 1:00 to about 4:00 PM.

At first, the dough just looked melty and I could see one spot where it looked like butter was making a small puddle. As the afternoon wore on, the dough began to look more and more set. When I went to back the car up to get more sun (about 4:00 PM), I noticed that up close the cookie looked set. So, I touched the top and it was firm. By the way, the pan was too hot to handle without an oven mitt. I'm now waiting for the cookie to cool before I cut it into wedges.


So, I cut the big cookie into slim wedges.

Look, you can see those are baked cookie crumbs on that cut edge. 


The chocolate is still melty, so I'm chilling these for a bit to firm them up before removing the rest of the cookies from the pan.

After chilling, they came out of the pan nicely, and we all enjoyed them.

On Sunday, I tried individual cookies on a sheet of parchment paper in a small baking pan. My car oven got up to 180 degrees F at one point and remained there for over an hour. I baked these cookies for almost 4 hours, moving the car once towards the end to catch more sun on the dashboard. The steering wheel was so hot I could barely touch it.

For your information on baking car cookies --

  • I cut a chocolate chip cookie recipe in half, adding a bit more flour on Sunday and some oats on Saturday, trying to keep the cookies from spreading too much. I will be trying another batch of cookies today, adding just a touch more flour to the dough.
  • The car had been sitting in direct sun with the front windshield facing the sun for about 45 minutes before I checked the interior temp and put the cookie dough inside. I would guess you'd want to "pre-heat" your car oven for about 1/2 hour to 45 minutes before baking. All windows rolled up and front facing sun, if that's where you have a dark, flat surface for baking.
  • Place a fabric trivet or pot holder under the pan to protect the dashboard surface. And use potholders to remove the pan after baking. It will be hot.
  • Use some sort of oven thermometer to check the interior temp of your car. Food safety experts recommend perishable food not be held below 135 or 140 degrees F (I've read both figures on safe temps). And a cookie might not bake before the sun goes behind trees/buildings if the interior temp is below 160 degreesF.  I did my baking at temps ranging from 165 degreesF to 180 degreesF.
  • Leave the thermometer on the dashboard where you can read it through the windshield. Just like a regular oven, heat will escape every time you open a door. Unlike a regular oven, it takes a while to build up heat once again.
  • The best hours of the day for car baking are between noon and 6 PM for most areas.
  • While it felt really hot to us, the outdoor temp "only" rose to 95 degrees F on Saturday and 100 degrees F on Sunday. Some folks say you need a day hotter than 100 for car-baking. Mid to upper 90s look like they might work, too.
  • You can bake individual cookies on a large tray or in a cake or pie tin. I chose a cake pan on Saturday (which I greased first) as I originally had thought I'd try baking in a dutch oven set on my deck in full sun (see above -- not hot enough). Then, as I said, I tried individual cookies on Sunday, lining the pan with parchment paper. The individual cookies seem to hold together better than the cookie slices. However, I had to carefully remove them from the parchment with a thin metal spatula.
  • If your dash slants away from the sun, place your oven mitt/trivet so that the pan will be tilted very slightly toward the sun. You want the sun to directly hit the cookie dough.
  • I kept the doors to the car closed as much as I could, checking on doneness through the windshield.
  • In my experience this past weekend, car-baked goods don't brown like oven baked ones. Just something to know in advance. I found I had to look to surface changes to get an idea of whether or not something was baked.
I also baked a small loaf of bread both Saturday and Sunday. Saturday's bread was risen too much by the time I put it into the car, so it fell back. Still tasted okay, just not poufed up. for Sunday's loaf, I timed putting it into the car about halfway through rising. It continued to rise for about an hour while beginning to bake in the car. It fell back just a bit in the center before firming up. The end result was a dense layer beneath a bubble of crust. Upon cutting into it, the dense layer was a bit doughy. It was okay toasted, however. I'm going to try baking flatbread in the car today.

So, I took this heatwave as an opportunity to experiment. Seeing the positive side like this helped the time to pass and gave me something to look forward to instead of dread. 

More photos from Sunday's baking:


More hot weather cooking to come . . .

Friday, June 25, 2021

Cheap & Cheerful Menus for Late June


We haven't done one of these in a while. What's been on your menu lately?
Here's last week's dinner menus. Anything with an asterisk came in part or whole from the garden.

Friday
homemade pepperoni pizza
*fruit salad
*tossed garden salad


Saturday
refried bean tostados on
corn tortillas with canned tomatoes, cheese and
*garden lettuce
*fresh strawberries

Sunday (Father's Day)
burgers
potato chips
broccoli slaw
oven-roasted vegetables
*sundae bar/root beer floats (strawberry topping, hot fudge sauce, caramel sauce, nuts, sprinkles, chocolate chips, vanilla ice cream, root beer)


Monday
*tuna and macaroni salad over a bed of mixed garden greens
*fresh strawberries with strawberry yogurt

it's strawberry season

Tuesday
white bean chili
cornbread
*fresh strawberries

it's also rhubarb season
Wednesday
hot dog cook-out (used leftover burger buns)
*fresh strawberries
*rhubarb jello
leftover broccoli slaw


Thursday
*Featherbed eggs (our name for eggs with herbs, this time chives)
*rosemary rice
*tossed green salad
*strawberries
*rhubarb jello

You may have noticed, we had strawberries most nights. this is peak strawberry season in my garden. Every morning I go out and pick the strawberries for the day. I then move on to the pots and baskets with salad greens.


The rosemary is wonderful and prolific this year. I've been making rosemary lentils, rosemary bread, and rosemary rice with the abundance. The rosemary rice is cooked brown rice topped with a large handful of chopped rosemary, some garlic powder, and olive oil. It doesn't take much more time than plain brown rice, yet the flavor is amazing.

It's Friday, so we'll be having homemade pizza again while we watch a movie on the roku.
What's been cooking in your kitchen this past week?

Thursday, June 24, 2021

One of the Chores of Keeping an Emergency Pantry

image source:
https://synergyappliances.com/blog/
20-kitchen-organization-ideas-to-make-your-life-easier-in-2020-/

If there was a job description for my role in our household, the number one item would be "food supply". It's my job to make sure that there is always enough food for us. I grow it, can it, buy it, and manage it.

Just as we all clean out our refrigerators periodically to ensure we're not letting any foods go to waste, if you keep a back-up pantry or home-can a lot of produce, we need to periodically go through all that we have in store, take an inventory. I do this about 3 times per year. It helps keep me organized, makes better use of my space, and prevents loss of foods from exceeding the sell-by date.

Wednesday afternoon, I had an appointment with my back-up pantry. I pulled everything off the shelves, checked sell-by dates, sorted what I had into logical groups, set aside those items that were open and partially used, then put it all back into place. I made note of what I overbought last year as well as what I was lacking.

The packages that were partially used -- these are products such as boxes of crackers where there are several wrapped stacks of crackers in one box or the same situation with a super bonus sized package of spaghetti pasta, or baggies of foods from the bulk bins, or partially-consumed bags of baking items that I don't want snacked-up (chocolate chips and nuts). These items had been scattered amongst the shelves. In my cleaning on Wednesday, I put them together in a shallow, open box, so at least now I'll know where to look for these foods before opening a fresh package. Why I didn't think to corral these items together before escapes me.

I began building this emergency pantry one year ago this month. It's interesting for me to see what I bought too much of, what I bought too little of, and of which items I bought just the right amount -- the Goldilocks of my pantry.

Foods I bought too much of included pasta, instant mashed potatoes, canned tomatoes, white rice, whole wheat flour, pinto beans, canned corn, powdered milk, and jarred applesauce. And the foods that I bought too little of included coffee and decaf (we constantly ran out) and vegetable oil. I bought just about the right amount of peanut butter (one jar left), raisins (ran out 3 weeks ago), Parmesan cheese (ran out 3 weeks ago), most of the canned vegetables, white flour, sugar,and cocoa powder. The good news for the items that I bought too much of, all of these foods will continue to keep in the back-up pantry for several more months or can be frozen to stretch their usable life even longer. 

One of my observations from this inventory is that I overbought more than I underbought. I had intended to buy just about a year's supply on many essential pantry goods and a winter's supply of produce-related items (knowing my garden would provide produce beginning in early spring). My conclusion is that having never put together such a back-up pantry, I did okay if not a little bit skewed in my planning due to extensive media fear-mongering.

Another observation -- we don't have a basement, just this small space with shelves behind the door in my office. If I needed to store additional amounts or if my space were even smaller, I could cram more in by eliminating the boxes for many items. Boxes make stacking look orderly, but they take up a lot of space. 

My last observation is how fortunate we are to live in a time when we are able to buy what we need and when we need it for the most past. Imagine living on a small farm 200 years ago, a time when you had to produce all of your food for a year in one season and find time and energy to put it all away for keeping. Having a lot of children would mean that eventually they would reach an age when they could be of serious help. However, you still had to deal with all aspects of raising small children before those years while at the same time you were producing and putting away food. And we often struggle in these days just to take care of our smaller families.

These are just some of my thoughts after having cleaned out and organized our emergency food storage. You got to come along for the ride because I don't think any of my family members would want to hear about my thoughts on our back-up pantry.

Wednesday, June 23, 2021

Growing Next Year's Spinach Seeds


Every summer, I choose one or two vegetables to go to seed for the purpose of "growing" my own seeds. I usually collect enough seeds off of one plant for 2 or 3 years for that vegetable. Two summers ago I let kale go to seed. Last summer, it was beets and radish. This year, so far it's spinach.

When my vegetables begin to bolt, I pick the two most healthy looking specimens and transplant them to a spot where I can nurture them to the seed stage. I look for a spot in the garden that gets plenty of sun and reliable watering. Then I let nature do the rest.


Some plants will set seeds the first year. Others are biennials and don't set seeds until year two. So, I choose a spot for seed-setting that won't need to be disturbed to plant something else.


My spinach plants in pots on the deck were bolting.  I chose the best two plants and moved them into the recovering strawberry bed. (TThis was last years potato bed. This year, I moved some new strawberry plants into the bed and am waiting for them to send out runners.)


Afterward, I plucked all of the leaves off of the other spinach plants, pulled up the roots, stirred up the soil with some fertilizer, and reseeded those pots. I should have more spinach for salads in late July.

I have limited spare space to devote to setting seeds, so I only choose one or two types of seeds to produce each year. As soon as a crop is done in my beds each spring and summer, I move another one in -- maximizing my garden space.


Just an FYI -- the email subscription service that I've been using for this blog for the past 9 years is ending their delivery in July. If you're an email reader, for the time being I won't have an email delivery system (until I figure something out). If I set up another delivery service, you'll need to enroll again. I'll make it obvious and easy to do so at that time. In the meantime, Bloglovin has been a popular way to check out my blog and others. Sorry about any inconvenience.

Tuesday, June 22, 2021

Another little thing I do to conserve water . . .

Those hanging baskets -- When the temps are hot, I water them once per day. And I water each basket until water begins to drip through the drainage holes. Sounds standard.


Two of the baskets hang directly above trough planters. So when they drain, they water the trough planters below.


For the other baskets, I place an unwatered basket beneath a draining one, so that it too can be watered, using (in part) what drains out of the one hanging.

Just a little thing, but having someplace productive for the drain water to go is a savings.

Monday, June 21, 2021

Hello, friends!

I hope you all had a lovely weekend. My weekend was a busy one. I was preparing the house and yard for a visit from our son and daughter-in-law on Father's Day. A lot of work, but worth it. I have a lot of comments from Friday's post on water conservation. You all have some great ideas and things I'd never heard of in one case or never thought of. I'll put together my comments today. I'll also publish another post later today or into the evening. Until then, wishing you a wonderful beginning to your week!


Friday, June 18, 2021

Your Best Tips for Saving on Your Water Bill

the style of rain barrel that we bought 20 years ago -- functional


After posting earlier this week about all of the rainfall in my area this month, I realized that in many areas rainfall is not nearly so plentiful. But beyond the here and now, Seattle summers are usually quite dry. July, August, and September see very little rainfall here. These are just the months that my garden needs water to support vegetable growth the most. I would imagine that for those of you who are also keeping a vegetable garden that this is a concern for you, too.

Municipal water is expensive just about everywhere. And it continues to become even more expensive with each passing year. About 10 years ago, my district needed to improve infrastructure to accommodate all of the new housing going in. To pay for this, our billing rate increased significantly. Then, a few years ago, the district went onto a tiered billing plan. If we use just a little water, we get billed at the lowest rate. (This entire time, we have never used the amount in that lowest tier.) If we use a moderate amount, we get billed at a higher rate. And if, as it is for us, we use a higher amount of water each month, we get billed at the highest rate. Tiered billing sometimes seems unfair to the family that is using their yard to grow some of their food supply. But it is what it is, so I just deal with it and try to conserve. 

I know that my situation is not unique. Water is becoming one of the more challenging bills for many households. A 2017 study suggests that about 10% of households have difficulty paying their water bills. This is anticipated to increase to as much as 30% in the next few years. [Mack, E., Wrase, S. (2017). A Burgeoning Crisis?] I expect that all of us wish our water bills were less.

Today, I thought we could share some of our best water-saving tips to help us get through the dry months ahead. I'be already mentioned a few things we do to conserve water, here. But I'll list them again. Please add your tips in the comments.

  • We have two 75-gallon rain barrels. I start the planting season with full barrels and typically run out of water in early to mid-July. This year, the rain barrels got refilled this past week  -- water may last till mid-July.
  • I save rinse water from vegetables and do one of three things: top up the nearest rain barrel, fill a watering can to use later, or dump on one of the deck planters.
  • I use soaker hoses in the blueberries and rhubarb from late June through August. Less water is wasted on pathways with soaker hoses than using a sprinkler in this area of our yard.
Tell me, what are some of the ways that you've reduced your water bills, presently or in the past.

Thursday, June 17, 2021

Old-Time Hot Fudge Sauce


This is the real deal, a satiny and thick hot fudge sauce made with real ingredients just like mom and pop ice cream parlors used to make.

When I was a little girl in the 60s and early 70s, we had an ice cream parlor that had been run by a sweet couple for many years. They made all of their own toppings. The whipping cream was real whipped cream, made fresh each day. The butterscotch topping was made with heavy cream, and the hot fudge was made with real butter. There were black and white photos of teens enjoying double dates in the 1950s on the walls of the seating area. I was just a little girl, but this formed my idea of what it would be like when I was a teenager. Little did I know that the world would change dramatically by the time my teen dating years rolled around.

Thick, rich hot fudge sauce was the topping I chose when my parents treated me to a birthday sundae. When my sundae was placed before me, I scooped up that first delicious bite. The sauce was warm and melted the surface of the vanilla ice cream beneath. I savored every spoonful of that delicious goodness. In the bottom of the small dish, I swirled together the very last of the melted vanilla with remnants of the fudge sauce on the edge of the glass, making a tiny spoonful of creamy chocolate milk for my last taste.

This recipe makes a hot fudge sauce that takes me back to that childhood memory. It's made with real ingredients -- butter, cocoa powder, sugar, corn syrup, salt, vanilla extract. And it's economical. A 10 oz jar of my homemade fudge sauce cost me 60 cents (or 6 cents per ounce). Compare that to Smucker's Hot Fudge Topping at $1.98 for 11.75 ounces (0r 17 cents per ounce). The homemade is almost 1/3 the cost of the commercial product.


This must take a lot of time and work, right? Nope. It takes me about 10 minutes to make a batch and requires no special tools, just a spoon and saucepan.

Old-Time Hot Fudge Ice Cream Topping (yields 10 ounces, or about 6-8 servings)

3 tablespoons butter, cut into 6 or so pieces
6 tablespoons cocoa powder
1/3 cup hot water
1 cup sugar
2 tablespoons corn syrup
1/16 to scant 1/8 teaspoon salt
1 teaspoon vanilla extract


In a medium saucepan over Low heat, place the butter dices and cocoa powder. Stir constantly until the butter has melted. Pour in about half of the hot water and stir vigorously. Add remaining water and stir again until well-combined. The mixture will resemble a thick pudding. 

Keeping the pan over Low heat, stir in the sugar and corn syrup. Continue stirring until the sugar has mostly dissolved, about 1 minute. Add the salt. If you used unsalted butter, use the greater amount of salt (scant 1/8 teaspoon). If you used salted butter, just a dash of salt will be enough, no more than 1/16 teaspoon.

Bring to a boil over Medium heat. Once boiling, reduce to Low and allow to boil gently without stirring for 5 minutes. After 5 minutes, remove from heat and stir in the vanilla extract. Cool to just warm for immediate use or store in the refrigerator for up to 3 or 4 weeks. 

This sauce thickens as it cools. When using at a later date, reheat briefly in the microwave until pouring consistency.


This Father's Day, we're planning a barbecue followed up with a sundae bar. I bought a bucket of vanilla ice cream at WinCo last week and will add homemade caramel sauce, homemade hot fudge topping, homemade strawberry topping, chopped nuts, whipped cream, and sprinkles. I'm making the sauces/toppings during the week this week, so I can enjoy the weekend with everyone else.


In addition to ice cream sundaes, I also like warmed up fudge sauce on sliced fresh bananas. The taste is decadent without affecting my waistline.


~~~~~~~~~~~~~~~~~~~~~~~~~~~~~~~~~~~~~~~~~~
Be a voice that helps someone else on their frugal living journey

Are you interested in writing for creative savv?
What's your frugal story?

Do you have a favorite frugal recipe, special insight, DIY project, or tips that could make frugal living more do-able for someone else?

Creative savv is seeking new voices.


~~~~~~~~~~~~~~~~~~~~~~~~~~~~~~~~~~~~~~~~~~~~~~

share this post