Stay Connected

Wednesday, December 21, 2022

Making Our Christmas Crackers

One of our family's Christmas Day traditions is the opening of the Christmas crackers. Some years, a box of crackers have been a gift to us. Other years, I've bought us a box. This year, one daughter and I decided rather last-minute to make our own Christmas crackers. (Here's the story -- my daughter and I were exiting a store together when another shopper came in and asked the clerk if they had any Christmas crackers left. The clerk replied that they only had the small ones left. As we were walking away, I suggested we make our own, and I gave some ideas of what we could use and what we could put inside for free. I honestly thought this would go down as another one of those ideas that never materializes. But I do love a good craft, especially one that sort of saves us money. I say sort of because we were on the path of just doing Christmas without crackers this year.)

onto the crackers . . .

We spent a couple of hours one afternoon and used only materials that we had on hand.


We began with the paper tube, made with a sheet of copy paper folded in half and rolled into a tube, securing with tape.


We needed items for filling, of course. So I started with simple, corny Christmas riddles. I found a page of them online, selected 6 that I liked, printed them out, and cut them into strips. I've folded each in half so the reader can take a guess themselves, as well as try to stump the rest of us.


We cut a bunch of tiny snowflakes to put in each tube.


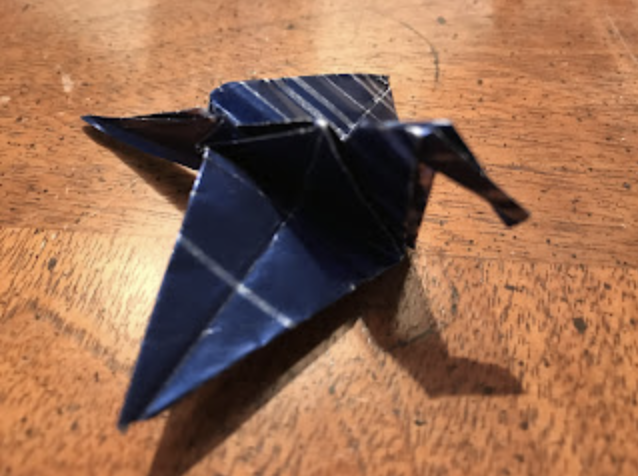
My daughter and I dusted off our origami skills (and found some instructions online) and made a couple of creatures, a star, a heart, and a couple of flowers, using scraps of previously used gift wrap paper. Foil gift wrap works best for tiny origami folding.


And of course, a piece of chocolate tops off the list of filling items. It's not really about what is in the cracker, but the fun of discovering each thing. After all, I no longer have any of the trinkets from previous Christmas crackers. They're not exactly of the "keeping" tier of bits and baubles.


We tucked trinkets into each paper roll.


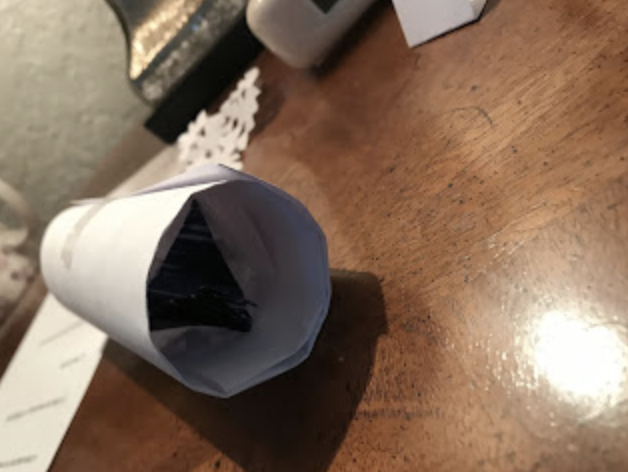
Then we wrapped each tube in tissue paper.


And finally, we tied the ends of the tissue in cuts of previously used curling ribbons and decorated each cracker with Christmas stickers that came free in the mail.


When I've bought crackers for our family before, I've spent between $10 and $15 for a box of 8. We made 6 of these crackers for pennies. Our costs were for 7 sheets of copy paper, a foot and a half of clear tape, 3 sheets of new tissue paper, and the 6 chocolate candies. The gift wrap for origami, the curling ribbon, and the stickers were all either free and new or previously used (basically free). Of course, our homemade crackers won't "pop" like boughten ones. But I think they'll be fun, nonetheless.

Tuesday, December 20, 2022

My Day in 10 Words

  1. snow
  2. sparkling
  3. baking
  4. tea
  5. spices
  6. laundry
  7. peppermint
  8. headache
  9. cookies
  10. mess


What 10 words would sum up your day?


Monday, December 19, 2022

Regifting a Gift Card

I was given a gift card Christmas of 2019 that I never used. One of my kids asked for a gift card to this very store for this Christmas. So, you can see where my mind is going. Why not just regift this gift card?

A couple of problems with regifting gift cards:
  • wanting the gift card to appear to be brand new and not previously used
  • wanting to increase the value on the gift card, if the gift card is a small amount
  • wanting a new activation receipt with a current date to attach to the card, so the gift card doesn't look like something I had lying around 
I wasn't sure how much value was loaded onto this gift card, and I couldn't find the little activation receipt which would indicate the value and the date purchased. So I took the gift card to the store and asked if they could tell me the balance without destroying the scratch-off PIN area. No problem, the clerk said. She swiped the card to find the value. I wanted to add to that value to make it a bigger gift. Again, no problem. After adding some money to the original card, the clerk handed me a new activation receipt with the upgraded card value and a current date.

And now, as far as anyone could tell, this is a "new" gift card and not a leftover.

I don't know if all stores will provide a new activation receipt or will allow you to add value, if desired. But it's worth a call or visit to see if this is possible, if you happen to have a gift card that you'd like to regift to a recipient who you believe would appreciate the gift card. In my case, it's a family member receiving this gift card and would probably have no problem with me regifting this card to them. But I do like the card to look as much like a new gift as possible. 

Thursday, December 15, 2022

Egg Substitutions: Which to Choose?


Another baking substitution post, and again, a substitution that I'm needing this month. I'm down to 2 dozen eggs to get through the end of the month. That sounds like a lot, but we have a couple of family holiday brunches coming up and lots of holiday baking to do yet. So, I'm considering where I can substitute eggs and where I should follow recipes exactly. So how do I decide which recipe merits an egg or two and which recipe can take a substitute, plus what substitute to use? Basically, I consider the function of the egg in each recipe.

In baking and cooking, eggs have 3 functions, to add moisture, add leavening, and act as binding ingredients. In most recipes, eggs will fill a couple of these functions. In cookie dough, eggs both bind the dough together, and they add leavening. In cakes and muffins, eggs add leavening and moisture. In meatballs, eggs serve as binding agents, but also can add moisture.


To give you an idea of why having just one all-purpose, egg substitute won't give you the best results every time, here are examples of different substitutes and how they can and can't work:

  • applesauce as egg substitute. Applesauce will add moisture to muffins and quick breads, but it has no leavening power of its own.
  • flax seed meal or soy flour, plus water. Both are great binding ingredients, but neither can leaven. 
  • baking powder. It leavens doughs and batters, but has no ability to add moisture, in fact it can dry out some baking.


So, to simplify which to use, here's my list -- the general functions of eggs and which substitutes work best. 


***Important -- For most recipes, the best results will come from doubling up on your substitutes (2 substitutes from different categories, such as -- add a moisture sub and a leavening sub for muffins, or, add a binding sub and a moisture sub for meatballs).


Adding moisture (like for muffins, cakes, quick breads, pancakes, waffles, meatballs)


To add moisture to a recipe, for each egg, substitute 
  • pureed fruit/veg like applesauce, pumpkin or banana (about 1/4 to 1/3 cup for each egg), or
  • yogurt (1/4 cup) or
  • silken tofu (1/4 cup) or
  • 1/4 cup of mayo  


Adding leavening (muffins, breads, pancakes, cakes, cookies)


To add leavening to a recipe, for each egg, add
  • 1/2 to 1 teaspoon of baking powder. For cookies, 1/2 teaspoon is generally sufficient -- but see the cookie recommendation below*. For muffins, quick breads, and cakes, 1/2 to 1 teaspoon baking powder or the equivalent substitute of baking soda and vinegar. Using a moisture substitute in addition to the baking powder will compensate for the missing liquid from the egg.
In a 1-egg muffin recipe, you might substitute 1/4 cup of applesauce plus 1 teaspoon of baking powder. This would satisfy both the leavening power and moisture addition that eggs give to muffin batter.

For cakes, you'll have the best results if you use a 2-egg, or more, cake recipe, and only substitute baking powder for 1 of the eggs.


Adding a binder (meatloaves, cookies)


To add a binding agent to recipes which normally call for eggs, for each egg, add

  • 1 heaping tablespoon soy flour, plus 2 tablespoons of water
  • 1 tablespoon of flax meal, plus 3 tablespoons of water
  • 1/4 cup silken tofu

All-purpose flour can also have binding properties, especially when used in conjunction with other egg substitutes, see below.


*I found with baking cookies, the following formula worked very well, for each large egg, whisk together:

  • 2 tablespoons flour, 
  • 2 tablespoons water, 
  • 1/2 tablespoon oil and 
  • 1/2 teaspoon baking powder 
  • In addition, for cookies that we like slightly moist, like chocolate chip cookies, I substituted 1 tablespoon of applesauce for 1 tablespoon of the butter called for in the recipe.

Wednesday, December 14, 2022

Baking Substitution: Homemade Sweetened Condensed Milk

With holiday baking in full swing, I thought I would share this substitution recipe. I first stumbled upon this recipe when my kids were small and our grocery budget was smaller. I was perusing a Parenting magazine at the library when I came across a recipe for 7-Layer Magic Bars. I had had them once before, so I knew they would thrill my husband and kids. However, I didn't have some of the ingredients. This substitution recipe made the Magic happen in my house that year. I posted this recipe a few years ago, in 2019. It was useful to me then, and is now once again.


Homemade sweetened condensed milk works:

  • in those bar cookie recipes (like Magic Bars) where ingredients are layered, then the milk is poured over all 
  • in Tres Leche cake, a yummy south-of-the-border fruit and cream cake
  • in homemade ice cream -- very quick and easy ice cream if you have some of this in the fridge)
  • to make your own seasonal coffee creamers, just add spices and/or extracts 
  • in candy-making, such as fudge 
  • or for use in caramel sauce


While this recipe yields just over 3/4 cup of finished product (about 8 to 9 ounces), larger batches can be made to keep in the refrigerator for up to 10 days for use in many different baking/cooking recipes.


The savings -- about half the cost of commercial 

For a price comparison, Walmart's Great value brand of SCM is $1.94/14 ounces at my local store, or 13.9 cents per ounce. This year (2022), that's my best price locally. My homemade version cost me about 55 cents in ingredients (in 2022) for 8.75 ounces, and about 5 cents for the gas stove, for a total of about 60 cents, or 7 cents per ounce, about half the cost of the commercial product.


Tuesday, December 13, 2022

It Looks Like Mache (Winter-Hardy Leafy Green) Can Survive Snow and Freezing


About 2 weeks ago we had several inches of snowfall over a few days. Cold settled in right after, and the snow stuck around for a week. The snow on the garden beds was about 6 inches deep for that period. I am happy to say that the mache survived. I picked a large handful of leaves to add to a salad for lunch the other day, and there's still plenty out there. Between the mache, the Brussel sprout greens, and the kale, I'm still able to harvest greens from the outdoor garden several days each week.

We may have snow again next week. So we'll see how mache does with repeated snowfalls.

Monday, December 12, 2022

Dinner for a Holiday Decorating Party That Almost Didn't Happen


In past years, we've had a family tree decorating party, where I make a dinner of snack-y foods, and we all help decorate the Christmas tree. This year, we decorated the Christmas tree immediately after Thanksgiving dinner with our son and daughter-in-law. But my household was missing having that special snack-y dinner, so we planned on doing the house decorations along with this special meal. Our house holiday decorating consist of hanging a garland, putting artificial poinsettias out, setting up the caroler figurines, getting out the Christmas tablecloth, etc. We did this on Monday after work. And we ate in the family room with the Roku set on the Yule Log via YouTube.

The menu

sliced summer sausage
sliced cheddar cheese
homegrown carrots sticks
cheese-yogurt dip
hummus dip
black olives
dried apricots and cranberries
rye crackers
mixed nuts
orange segments
two kinds of holiday cookies
and that perennial party favorite -- roasted turnips

Monday morning, I wasn't sure we were going to do this. I was tired and not feeling it. I thought the dinner would entail me making a special shopping trip to pick up a few foods. And that made me want to do this even less. So I began getting foods out for a normal dinner and set carrots and turnips to soak before scrubbing the garden dirt off.

Both daughters really wanted us to decorate the house soon, so I began to nudge my thinking into the possibilities using what I had on hand. I had already bought the summer sausage at Grocery Outlet back in November with the plan to use it when we decorated the tree and house. But I didn't think I had much else. After rummaging in the fridge and pantry I came up with everything else on the table. The vegetables were washed and then cut. I oven-roasted the cubes of turnips and we used toothpicks with them. The cheese-yogurt dip was yogurt I strained then mixed in salt, black pepper and cheese powder. My family said it was quite good (I can't eat any of it, due to dairy). To drink, my husband and daughters also made themselves some hot cocoa using the homemade cocoa powder I keep in a jar on the counter this time of year. I'm a water person when it comes to meals.

The meal came together once I adjusted my thinking.


Sunday, December 11, 2022

A Pair of Mittens, a Chocolate Bar, and a Little Bit of Crafting for an Inexpensive Gift


When I saw this craft, I thought it was too cute to not do. And as it turned out, it was so quick and easy and very, very thrifty (the cost of dollar store mittens and 1 regular candy bar). I usually give my daughters a pair of dollar store mittens each year anyway, which made this an easy "yes" on my list. I know my daughters will be tickled by these cute little snowmen.

The original idea comes from Amy Latta's blog, in this link.


Supplies:

  • a pair of knit mittens, thinner mittens work better than thick bulky ones (mine came from Dollar Tree)
  • one normal size, flat chocolate bar (I used regular Hershey bars)
  • a black felt pen
  • crayons for color, orange (for the carrot nose) and any other color (to fill in the buttons), pink for smile tips
  • a long, narrow strip of felt or scrap of colorful fabric to make the scarf (about 1/2-inch by 9 inches)
  • 1 small rubber band
  • 1 sheet of white paper
  • clear tape
  • scissors


1) Wrap the sheet of paper around the packaged chocolate bar just a little bit loosely (so you can slip the candy bar in and out for decorating). Trim off the excess paper. The ends of paper are not sealed over the  ends of the candy bar. Tape the back side closed.


2) On one of the mittens, invert (tuck in) all of the fingers and the thumb so they are on the inside of the mitten. Roll the other mitten up tightly and tuck inside the first mitten. This bundle of both mittens will become the hat of the snowman.


3) Slip the candy bar out of the white paper "tube" for coloring purposes. Use the black felt pen to draw the facial features, outline the carrot nose, and draw round buttons with cross-stitching inside each. Use the crayons to add color to the carrot nose, buttons and add pale pink cheek circles to the snowman's smile, if desired.


4) Slide the candy bar back into the now decorated paper sleeve. Pull the mitten "cap" over the end of the wrapped candy bar, leaving the rolled up mitten on the back side of the snowman inside the first mitten.


5) After adjusting the snowman's cap, secure the rubber band around the top of the mitten "cap" about 1 inch below the very top. This creates the illusion of a pom pom on the top of the cap.


6) Tie the felt or fabric scrap around the "neck" of the snowman as his scarf. Voila, you're done!

These took me about 15 minutes each to make, from start to finish, including some practice time drawing the features on scratch paper and redoing one snowman face, as I didn't like how it turned out. But they're not meant to be perfect.

Just a couple of cute, yummy guys for my two gals.

Perhaps it's my inner child, but I think "kids" of all ages would find these adorable. But I especially think this would be a great gift for the littles in your circle. Very inexpensive, includes some chocolate and mittens, and is wrapped in a cheerful presentation. 

Thursday, December 8, 2022

If You Don't Buy Chips and Other Pre-made Snack Foods, You Can Afford Bacon


. . . or steak, or nice vacations, or whatever else is your fancy. And the reverse is true, too. If you don't buy bacon, you can afford chips and snacks, even on a tight budget. It's all about choice. What made me think about this is I went shopping at WinCo this week and I bought 3 packages of bacon. But I completely bypassed the chips and crackers aisle. I wanted bacon, and I knew my family would really enjoy bacon. So that's what I chose to do with our grocery budget for the week. 

So often I think about what we can't have or can't do, due to financial constraints. But in reality, we can afford 98% of what we could put on a wish list. We might have to cut out something or save for a longer period. In the end, we could afford almost everything.

It helps my financial morale to remember this aspect of budgeting. Instead of feeling deprived, I end up feeling grateful for the blessing of choice.

Have a wonderful weekend, friends. And I'll be enjoying more bacon. . .

Wednesday, December 7, 2022

Your Tips: Taking Care of Ourselves in December


December can be such a difficult month for many people. There's the low level of sunlight and shorter days. The holidays bring up all sorts of complicated feelings, from loss of loved ones, to familial conflicts, to personal inadequacy, to feeling left out. The spending can be stressful and not joyous. More viruses circulate and our defenses could be down. And, the weather could make spending time outdoors unpleasant. So, it's no wonder this can be a difficult time for so many. 

For myself, I have Seasonal Affective Disorder, I feel a huge sense of loss this time of year as the anniversary of my mom's passing approaches (she passed away just before Christmas of 1984), the financial stress takes its toll, and I tend to work extra hard making the holidays a special period for my family. I don't think I do a very good job of taking care of myself in December. 

Last year, I became sick on Christmas Eve. Our Christmas celebration had to be postponed 2 weeks as a result. I don't want that to happen again this year for me, and I don't want it to happen to you, either.

So, I thought we could all share 1 or 2 tips for taking care of ourselves in December.

My two tips:

  • don't skip meals. Eat regular, healthy meals, on schedule. I know I feel better if I'm eating healthy in December and limiting the treats that I eat. It's a choice. I can eat healthy and feel well, or I can eat treats and feel not up to parr. I just have to remind myself of the consequences to eating a plateful of fudge or cookies.
  • get to bed on time. It's tempting for me to stay up late, but I also know that my best chances of shortening any virus I may contract is to sleep well every night. Even if this means I'll miss out on one or two late-night, fun experiences during the season. We will no longer go to the late church service on Christmas Eve, as an example. Count me as one of the fuddy-duddies who can only go to the early service.
Your turn. What are 1 or 2 of your best tips for not only surviving December, but truly enjoying it? How do you take care of yourself this time of year?

Tuesday, December 6, 2022

More Low-Tech Heat Conservation: Wearing Knit Headbands Indoors


We all know that wearing a hat outdoors when the weather is cold will help keep us warmer. According to this article from Harvard University, when our bodies feel the cold in winter, blood is diverted away from the extremities and into the core of our bodies and to our brains. So, to keep your fingers and toes warm, put on a hat when venturing outdoors in winter.

But what about inside our homes for those of us who keep the thermostat lower than average? Personally, I can't tolerate the extra heat of a hat indoors. Even when the house is set at 64 degrees F, a hat is just too toasty for me. However, I've found a heat-retaining solution that's a step down from knit hats, my knit headbands. For those of you who have been reading here for several years, you may remember me posting about the headbands that I knit for my two daughters Christmas 2013. I used yarn that was leftover from other projects and knit in the garter stitch (knit on both sides, no perl). Both headbands were simple and quick to knit, and my daughters still wear them now, 9 years later. 

A couple of Christmases later, one of my daughters gave me the two knit headbands above. These are what I wear on my head in the house when I'm chilled. They're not so warm that I overheat, but warm enough so I can tolerate lower indoor temps.

I thought I'd share because I know many of you knit and likely have extra yarn from other projects. Or perhaps you're looking for something to put on your holiday wish list that would be practical, yet fashionable. With trying to conserve energy used for our home's heat, many of us are turning the thermostat down a degree or two. While I can use a throw when sitting, the headband solution is something I can do to help stay warm while moving around.

With my two headbands, each offers a different level of warmth. The red one is a looser knit and not as warm (good for when I'm just a little chilled or when going out for a walk when temps are above freezing). While the brown one is fleece-lined and very insulating (good for very cold days indoors or out, or after I've washed my hair and I'm waiting for it to air dry). I use both headbands all winter as part of my winter clothing arsenal to stay warm, both indoors and out.

Monday, December 5, 2022

The weekend didn't quite go as planned . . .

I injured my back Friday morning and spent the weekend laid up. Today (Monday) was the first day I was up and working for any length of time since Thursday evening. I hope I didn't overdo it today. I really needed to get some kitchen stuff done and needed to feel I was being effective. And it seems that my family needs me.

So for today, I cooked up 1 more carving pumpkin (3 down, 1 to go of those pumpkins), made a batch of hummus, boiled some eggs, started some sprouts, cleaned up my indoor garden area, and made dinner. When I said my family seems to need me, I think they largely missed my cooking. They could see and talk with me whenever they wanted while I was laid up, but I couldn't do much in the way of food prep for 3 days. Today's focus needed to be on food, in one way or another.

Last Thursday, I worked in my light garden area, harvesting more radish greens and cleaning out 1 flat of radish plants to start new radish seeds. My light garden is a set-up of 4 trays with pots under 4 sets of grow lights. As I've mentioned before, I use the bottom halves of gallon milk jugs for my grow containers. These are free and slightly squared, so less space is wasted in the tray.

Instead of complaining about my back and the subsequent catch-up work, I thought I'd share the growth cycle of a tray of radish plants.

I begin with containers filled with potting soil, poke holes in the 
surface and plant my seeds and push soil over to cover.

After about 5 days, the seedlings are up.

2 weeks later, the secondary leaves develop.

Weeks 3, 4 and 5 yield lots of leaves
to use in salads, soups, and stir-fries.

Although I grow radishes indoors for the leaves,
we also get some roots to use in salads.

By the end of week 5 or into week 6,
 the plants looks like they've seen better days.

At this point, I harvest all of the edible-looking leaves to use in meals.

I scoop out the remains of the plants and about the top 1-2 inches
 of soil from the containers and add to the compost pile.

I then add some fertilizer and top off the soil,
so I can begin a new batch of radish seeds.

Thursday, December 1, 2022

Wintry Vegetable Harvesting


Transport your mind back to the late-19th century. It's autumn of 1872, and you've taken a homestead claim on the High Plains. Everything in the world that you own is in your small shanty. You have to provide for yourself and family with what you can hunt, grow and raise on this never-before-cultivated soil, plus the last of the provisions you brought west with you. There's no Amazon, GrubHub, DoorDash, or Walmart delivery. 

Snowfall came earlier than you expected, but late enough to harvest most of your crops and produce. There are no snowplows, no supermarkets, and no SUV to get you into town even if you had the means to buy your food. 

The snow is fresh and only 8 inches deep. You have a choice. You can sit by your fire and start in on the foods you've put up for winter. Or, you can go out into the snow and see if there's anything that can be picked to make into meals in the next handful of days, thus delaying the date when your set-aside, finite provisions will run out.

This is the spirit that motivated me to head out into our snowy winter landscape and see what I could pick to add to meals in the next few days. Our light dusting of snow turned to 8 inches the other night. I've harvested almost everything from the garden. But I want to get as much as possible out of it before the plants die.


Here's the Brussel sprout patch. Brussel sprout greens and kale are the greens most likely to survive snow and cold. The leaves are still edible. 


I clipped a bucket full this afternoon to bring inside. I'll be able to pick another bucketful tomorrow, too. I'll keep harvesting until there's nothing left to pick. And then, and only then, I'll begin on the veggies that we put away in the freezer for winter meals. 

Our plan has been to get as far into December as we can, harvesting what's available in the garden. Later this month, we'll switch to frozen and canned veggies.

Remembering those pioneers who trekked west, bringing with them not much more than grit and determination.

Wednesday, November 30, 2022

Pumpkin-Spice Applesauce


This was actually really good. When I first mixed it up, I wasn't sure we'd like it that much. I made it as a way to use up the last of a jar of applesauce and some thawed pumpkin puree.


I mixed together about 1/3 home-cooked pumpkin puree, a little over 1/3 applesauce, and the rest was water to thin to the right consistency (pumpkin puree tends to be thicker than applesauce), brown sugar, and pumpkin pie spices (ground cinnamon, nutmeg, ginger, and cloves). That's it. I shook the water up in the near-empty applesauce jar and used that to thin the mixture, getting near every last drop of applesauce from the container.

This was a very frugal lunch addition and appropriate for the season. And the bonus is the pumpkin's nutrients were hidden in a side dish that I know my family enjoys. I can't wait to make another batch!

~~~~~~~~~~~~~~~~~~~~~~~~~~~~~~~~~~~~~~~~~~
Be a voice that helps someone else on their frugal living journey

Are you interested in writing for creative savv?
What's your frugal story?

Do you have a favorite frugal recipe, special insight, DIY project, or tips that could make frugal living more do-able for someone else?

Creative savv is seeking new voices.


~~~~~~~~~~~~~~~~~~~~~~~~~~~~~~~~~~~~~~~~~~~~~~

share this post