Stay Connected

Tuesday, June 27, 2023

The most cost-effective way to improve your surroundings is to clean and repair what you already own.

This is true of the things you find to be necessities as well as the little luxuries that enrich your day-to-day living. 

the umbrella stand spent too many winters outdoors in the elements

I kept that thought in mind while I gave our patio umbrella the once over. We've had this umbrella for 15 years. The canvas covering had become dingy and stained, and the stitching had given way at stress points. The black paint finish on the stand had eroded from winter rainfalls and now revealed the concrete under that paint. The umbrella no longer looked attractive in my eyes.

I could just replace our old and worn patio umbrella. Instead, though, I chose to spend 2 afternoons bringing this one back to life. 

I sponged the cleaner on with a rag then hosed it off after 5 minutes.

Yesterday, I cleaned the canvas, laying it out flat on the brick patio and using an outdoor cleaner that is safe for many types of surfaces (30 Seconds Outdoor Cleaner). After rinsing the cleaner from the fabric, I stretched it out to dry overnight.

I used some of the Rust-Oleum spray paint
that I'm also using on the thrift store chairs.

With the canvas clean and dry, I set out to put this umbrella into order. I gave the concrete stand 3 coats of black spray paint. The concrete drank that paint right up.

In between coats of paint, I resewed the torn seams and hems of the canvas then fitted it back onto the umbrella frame.

Under the umbrella are 2 of the 4 free-pile chairs
that we picked up 2 years ago.

Once all coats of paint on the stand were dry, I plugged the umbrella back into its stand, canvas cleaned with seams repaired and the stand repainted.

I spent two partial afternoons cleaning and restoring this umbrella, perhaps about 4 hours total, with a cost of about $2 in supplies. Our umbrella may not be new, but it does have a new lease on life, with hopefully many more years of service for us.

Monday, June 26, 2023

Celebrating Independence Day on a Budget


I picked up these 6 painted metal, patriotic garden stakes at Value Village for $3.50 total last week. They still had the UPC stickers attached.

I'm reluctant to spend very much money on holiday decorations that will only be on display for a few days each year. So I check thrift stores, garage sales, free piles, and stores like Dollar Tree for decor for holidays that don't seem to have a "season" for display. I can still have a few decorative accents in our home or yard, while spending very little money.

While at Value Village, I noticed they had quite a few of these patriotic home and garden decor pieces -- various plaques, garden decor, and mantel knick-knacks. Someone at some point paid the full retail price for all of these items. They later decided to replace those pieces with something new, donating the cast-offs to a thrift store. 

The way I look at it, paying retail price entitles a person to be the first owner of a good. I can understand the desirability of being the first owner. But for not being that first owner, I get a substantial discount on the good I buy at thrift stores or garage sales. 

There is a downside. Because secondhand decor pieces are so inexpensive, there's always a temptation to buy more stuff than I really have use for. I'll just have to muster some self-control.

Thursday, June 22, 2023

Cheap & Cheerful Suppers for Father's Day Week (Plus Photos From My New Project)

Friday    movie night - we watched Miss Potter (the story of Beatrix Potter)
chicken breast cooked in sauce of tomatoes, salsa, garlic, cumin, then shredded
rice and herb stuffed grape leaves
roasted turnip and beet root
tossed green salad (various greens from the garden)
rhubarb-blackberry crisp for the family, I had an almond flour chocolate chip cookie

Saturday
I made a vegetable and ham soup, using ham and chicken stock from the freezer, chives, turnip greens and thyme from the garden plus 2 grocery store carrots. It was delicious.

Everyone else had cornbread, and leftover rhubarb crisp with the soup. I had a banana.

Sunday Father's Day
Our big meal is lunch today. We had chicken-apple sausages, roasted vegetables (baby potatoes, carrots, onions, zucchini - a bagged mix), corn-on-the-cob, watermelon, tortilla chips and salsa, fruit juices, almond flour biscuits, pecan pie, vanilla ice cream, and almond flour chocolate chip cookies. 

My daughters baked the pie. They used a smaller pie plate than we normally use and filled a custard cup with some of the pecan filling to bake for my no-crust portion. Aside from the pie crust and ice cream, I was able to eat everything on the menu.

It rained off and on all day. I had a brief patch of no rain to dart outside and grill the sausages before the rain returned. My husband's wish for Father's Day was to play his favorite game. It's sort of a role playing board game. The box said the game is suitable for people as young as 10 years old and can be completed in 2 hours. It took us 7 hours. Maybe we're not as sharp as 10 year olds. 

Anyway, it was fun, although the evening went late. My son and daughter-in-law left around 11 PM. I hadn't planned a dinner, just the lunch. So I brought out whatever snack things I could find and offered beverages. It was a fun day, despite the late bedtime.

We didn't have much leftover from our lunch, just a half of a watermelon. We'll use that in meals during the week.

Monday
chili from the freezer (last week I made a double batch and froze half)
leftover cornbread for the family
last of the leftover rhubarb crisp for the family

I was so tired this day. Even though we stayed up late the night before, the sun woke me at 5:09 this morning. I chose an easy dinner and used one of my freezer meals. 

Tuesday
stretched leftover chili, adding some garden vegetables and canned tomatoes to make enough for one more night
garden salad
black olives
freshly baked bread and butter for the family
blackberry-rhubarb sauce

Wednesday
pancakes and syrup
sausage
watermelon and garden strawberries

I made my own pancakes using a gluten-free mix. They were good enough. But I didn't care for the cinnamon in the mix.

Thursday
Swiss chard frittata
brown rice
fruit salad (watermelon, strawberries, banana)
juice


Those were our suppers this past week. This was the first full week that I was gluten-free and dairy-free. Meals that I prepare for the family are a bit tricky, as I have to make sure that I have enough to eat while still making foods my family enjoys. Breakfasts and lunches are easier. On days my husband is working from home, I make a quick lunch for him and my daughters get their own lunches every day. For myself, I make my lunches 2 to 3 days at a time. I plate the extra servings and refrigerate, yielding a full, ready-meal for me to quickly microwave. I do the same for breakfasts. I make 3 days of breakfasts at a time and refrigerate the 2 extra plates of foods. I'm much more likely to eat well if I take the time to make several healthy parts of each meal. And I'm more inclined to take that time if I know I am saving time on future days, by making extra up front. 

My breakfasts are eggs with some sort of veggie in them, no cheese or milk, plus bacon or sausage and raisins or other dried fruit. Dried fruit gives me the sugar I need in the morning, compensating for not having a bread product with breakfast. Lunches are some chicken, sweet potatoes or quinoa, salad or cooked veggies, cooked apples, and some fresh berries. It's been advised that I eat as many of my fruits and vegetables in cooked form for the time being, hence the sautéed apples and cooked veggies. One of the biggest challenges of not having bread products, dairy foods, or many of the snack foods my family eats has been getting enough to eat each day. So I make myself big breakfasts and lunches, having meat or eggs at most meals, and serving lots of produce sides. Still, by 4 PM I feel like I could eat another meal. I may have to start preparing large, balanced snacks in advance, too.

That's it for food. Now, onto my latest refinishing project. . .

making this table


look like it was meant to go with these two chairs. And for anyone wondering why I bothered refinishing the table to black legs with brown stained wood top, now you can see I was trying to make all three pieces look like a set, a bistro set. 

So my new project is refinishing these 2 chairs.

It's hard to tell in this photo, but the tubular metal part of the chairs is, how do I explain this, sort of a mottled or antiqued, oil-rubbed bronze. The under color of the metal is copper, while the top color is dark bronze, rubbed away deliberately in spots to reveal copper.

The chairs were from a thrift store. I paid $5 each, the going price for chairs at thrift stores in my area.


Refresher photo for the table. I dunno, but I think the 3 will look like they were meant to go together once I finish the chairs.


Good weather returned mid-week, so I set up a spot in the garage while my two daughters had the car for work for the day. The chair seats are upholstered cushion over a wood seat. I didn't know what condition the wood would be in. I took my chances that the wood part of the seats would work okay for my plan. The seats unscrewed easily from the frame of the chairs. Getting the upholstery staples out were another story. But I'll worry about the seats later.


It turned out that the wood seat is in kind of rough shape -- 3 ventilation holes that will need plugging and a lot of sanding work needed. But I'll work with what I have. If I don't like it at the end, I can see about cutting new wood seats out of a sheet of plywood. But I'll at least try to work with what I've got. These will be outdoor chairs, so I'm not going for perfection.


With the seats off, I gave both chairs a light sanding to help the paint adhere. You can see the copper color better in this photo.


I used the rest of the can of black spray paint from the table project. I had given the table legs 2 full coats of black paint and one final spot coat for any missed places. There was at least a half can of paint remaining to get a start on the chairs.


I had just barely enough paint to give both chairs a light first coat. I'll need to go out to Home Depot and pick up another can to finish the chairs and do one small project coming up. 

My plan with the chair seats is to sand them well, plug those holes (maybe a dowel rod cut to fit  the holes, then glued in place and sanded), then paint the seats black on both sides and all edges and seal the finish. I'll keep you posted with photos when I finish.

That was my week. What were the highlights of your week? Any projects that you're working on? What was on your menu this past week? Did you end up with leftovers from Father's Day to use in the weeks meals?

Wishing you a wonderful first weekend of summer!


Wednesday, June 21, 2023

Can You Believe Some of the Items I Find on Free Piles? Here's the Latest!


Out walking in the lovely neighborhood next to ours, we spied this Ninja coffee maker with a "free - almost new" tag on it. It even had the owner's manual with it.


Not only does it make coffee by the carafe, but there's also a pull down stand for placing a mug to do one cup at a time. I found this late last week at just the right time. I had decided to try brewed coffee in place of my instant for a while. And just great luck that I would find a coffee maker for free that could make a cup of coffee on demand.

Taking walks in neighborhoods where folks get rid of nice items (either through free piles or garage sales) pays off. That's my kind of exercise.

Seen any good garage/yard sales or free piles yet this season?

Tuesday, June 20, 2023

Baking With Almond Flour

raisin-spice almond flour cookie

This past week I finally made the commitment to myself to stick with a limited diet in order to get some relief from my digestive symptoms and pinpoint the offending food(s). I slipped up one day last week and had a slice of bread, 2 graham crackers and some soup made with instant potatoes. One or all of those foods caused so much pain I could hardly function for a day. That was the motivation I needed. 


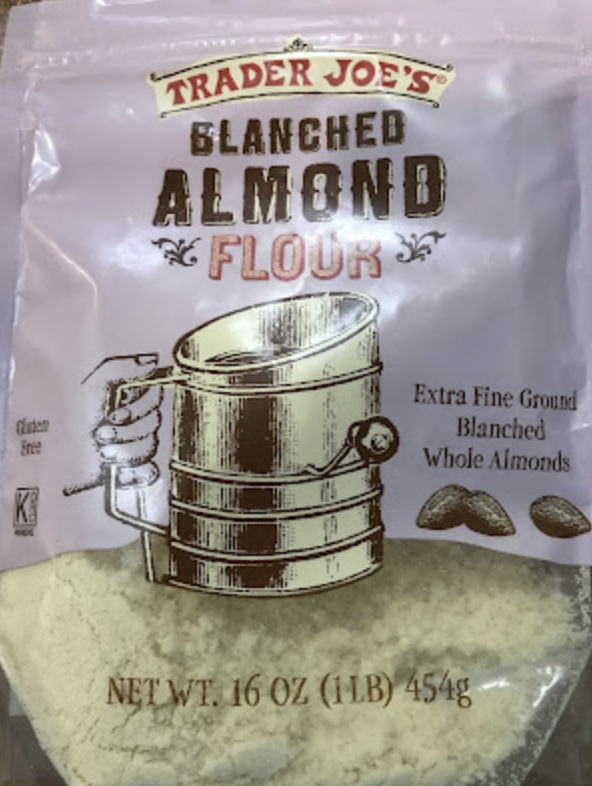
So I went to Trader Joe's and bought some almond flour. (I wanted to go easy on the rice for a few weeks, as rice sometimes bothers my gut, too.) I'm new to baking with almond flour, by the way. My past gluten-free baking has relied on rice flour.

I brought the almond flour home and proceeded to make the cookies on the back of the package. 


The recipe calls for 1 egg plus 1 egg white. I didn't want to have to deal with the leftover egg yolk, so I made a 2/3 batch of the cookies, using only the whole egg and skipping the white. Much math later and I had a lovely batch of 16 good-sized chocolate chip cookies that were completely grain-free and allergen-free (for me that is, others could have an allergy to tree nuts or eggs), containing almond flour, butter, brown and white sugar, egg, salt, baking soda, vanilla extract and chocolate chips. 


Those cookies were so incredibly good. The texture is that of a soft cookie and not overly sweet (my batch used a total of 5 tablespoons plus 1 teaspoon of white and brown sugar combined). I still had several left when my son and daughter-in-law came over on Father's Day. Knowing that my daughter-in-law is also gluten-free, I offered them some cookies at dessert time. Both of them loved the cookies.

Also on Father's Day, I had planned on baking some sort of bread product to go with our lunch. I found several good recipes for almond flour biscuits that looked like something both my daughter-in-law and I could eat, made with almond flour, butter, eggs, baking powder, salt, and honey.

photo credit: foolproofliving.com, the site where I found this biscuit recipe
https://foolproofliving.com/almond-flour-biscuits/

The biscuits were also a hit with my family, very buttery and rich. I'll be making these again very soon.

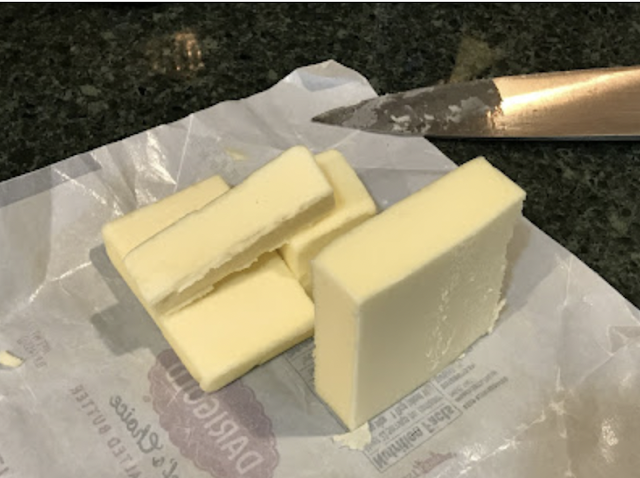
trying to get the portion of butter just right for the recipe -- it looks
like I'm stacking building blocks from the 1-lb butter block. 

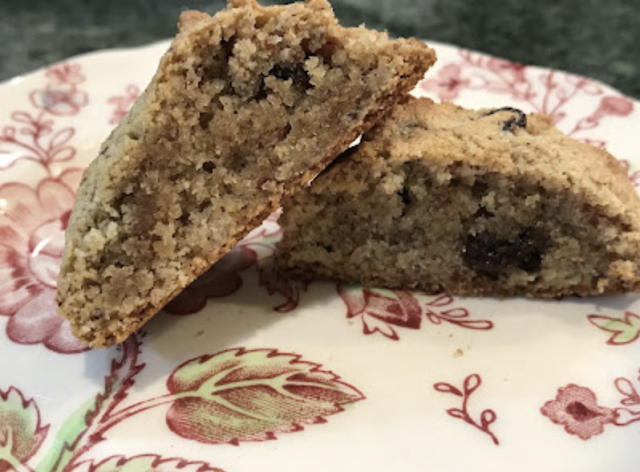
By Tuesday morning, we had polished off the chocolate chip cookies and the biscuits, so it was time to bake another batch of something. This time I decided to tweak the Trader Joe's cookie recipe to make raisin-spice cookies.


I made the raisin-spice cookies slightly smaller than the chocolate chip ones, so this batch made 20 cookies. In addition to subbing raisins for chocolate chips, I added pinches of ground cinnamon, ginger, and cloves to the dough. These are very addictive. But again, as with the chocolate chip cookies, they're not overly sweet and I feel like they may have some health benefits with the almonds and raisins.


If you're not familiar with almond flour, here's a little information. There are two kinds of almond flour, blanched and unblanched. The blanched almond flour is made with almonds after blanching and removing the skins, while the unblanched almond flour is made with the almond skins still on the nut meats. The blanched flour is preferred by many bakers due to its uniform color and texture. However, the unblanched almond flour is often less expensive and adds a nice home-baked appearance to the cookies or muffins. For your information, I used only blanched flour in both the chocolate chip cookies and the biscuits, but I used half and half blanched and unblanched flour in the raisin-spice cookies. 


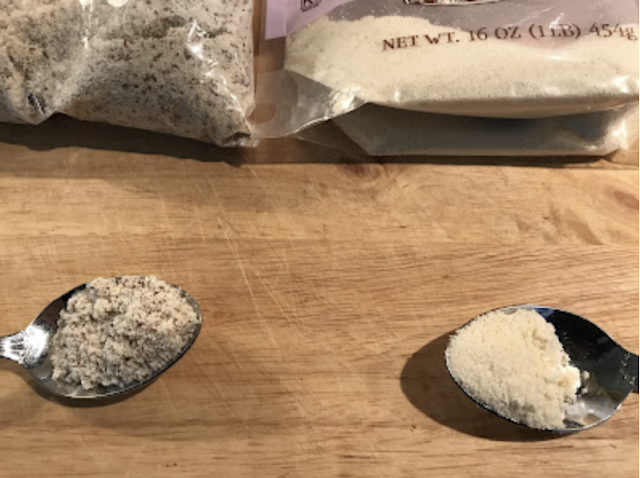
In addition to the almond flour that I bought at Trader Joe's, I also bought some unblanched almond flour from the bulk bins at WinCo on Monday. WinCo carries both blanched and unblanched almond flour. The blanched flour was about $4.50/lb, while the unblanched flour was about $3.89/lb. I wanted to try the unblanched in cookies and see what I thought of it. As I said above, I used a mix of both types of almond flour in my second batch of cookies and thought the cookies were good and didn't suffer from using part unblanched. Price comparison between Trader Joe's and WinCo's bulk bins, Trader Joe's 16-oz package of blanched almond flour was $6.49. So there's about $2 or more savings by buying the almond flour from bulk bins. The one caveat, if someone has celiac, I'd be hesitant to buy a gluten-free flour from a bulk bin where in-store cross contamination is a possibility. WinCo does dispense its almond flour (and other gluten-free flours) from containers that require pulling down on a handle and the flour flows out, as opposed to dipping a scoop into a bin. Their method of dispensing these flours likely minimizes in-store cross contamination.

Another thing to know about baking with almond flour (whether the flour is the blanched or unblanched variety), almond flour relies on eggs as both a binder and leavening. Regular wheat flour, in contrast, is a binder in itself and holds doughs together. A quick look at many almond flour baking recipes may surprise a person by the number of eggs called for. In addition, almond flour tends to result in denser products than those based on wheat flours. But we didn't find that an objectionable quality in either cookies or biscuits. I imagine almond flour layer cakes might not be as light and airy as traditional cakes, unless several eggs were used for leaven. 

So, that's been my experience with baking with almond flour this past week. I prefer both the texture and flavor of the baked products using the almond flour over my previous baking with rice flour. But I see a place for rice flour for some folks who need to be gluten-free. Rice flour is more economical than nut flours, and rice flour is less likely to pose allergies compared to tree nut flours. 

Anyway, for myself, I'm just hoping to heal my insides so I can get back to normal living. If almond flour can help me, then I'll be happy to use it.

Have you baked with gluten-free flours before? What was your experience? Was there any that you'd never use again? Any that were particularly good?

Monday, June 19, 2023

The Finished Garage Sale Table

Hi, friends! For those of you lucky enough to get a 3-day weekend, I hope you've enjoyed the extra day off. If you didn't get a 3rd day to your weekend, you have my sympathies.

It was a very late night last night. (More on that tomorrow.) So, just a quick post from me today. I've got a photo of the finished table, that $5 garage sale table. 

And to refresh your memory, here's the before photo.


I love, love, love the way the table turned out. It's got the vibe I was looking for. I had forgotten how much I enjoy refinishing furniture, a hobby I had when we were first starting out.

Anyway, the project was pretty easy, it cost very little, and I had a good time doing the work.

I'll be back tomorrow!

Thursday, June 15, 2023

Cheap & Cheerful Suppers for Mid-June

Friday
frozen pizza (freezer stash)
eggs and mushrooms
stuffed grape leaves (freezer stash)
roasted turnip roots
sautéed turnip greens and garlic
scratch cinnamon rolls

Saturday use it up supper -- a variety of leftovers to be eaten
plus
sautéed kale and rhubarb pie

Sunday
spaghetti and meat sauce
Sautéed Swiss chard
leftover pie

Monday
ham, egg and vegetable (including turnips and beets from the garden) fried rice (freezer stash)
scratch brownies

Tuesday
chili (freezer stash)
vanilla-rhubarb sauce
cornbread (freezer stash)

Wednesday
ham and lentil soup (freezer stash)
cabbage, kale, and carrot leaf slaw
leftover cornbread (freezer stash)

Thursday
eggs with peppers and onions
rice
corn (freezer stash)
carrot sticks


Turnips


We're in turnip season right now. I harvested turnips twice this week. I use almost all of each turnip plant. We use the roots, chopped, tossed with oil, salt and pepper then roasted. We use the leaves, shredded and sautéed with onions and garlic. And we use the stems. I chop the stems into 1/4-1/2-inch bits and freeze them in ziplock bags. I add these bits to purchased frozen chopped broccoli to stretch the broccoli.

I made a batch of ketchup this week. I used the ingredient list on a purchased bottle of ketchup as my initial guide. Our purchased ketchup label wasn't specific about what spices were used, so I looked up an old recipe for ketchup for that info. I taste compared the small amount of purchased ketchup remaining in the bottle with my batch on the stove and adjusted different ingredients until it was just about right. Kind of surprising how much sugar I needed to add to get the taste right. Anyway, my family seemed to like my ketchup well enough.

One of my goals this past week has been to empty the small stand alone freezer so I can defrost it. The frost is so great that it's taking up space that I need to store some of the garden harvest. However, it sure seems like when I take a few things out to use in meals or stash in another freezer, more freezer stuff appears. I know that's not possible, but there seems to be an endless amount of frozen food in that freezer. Once I do get it emptied, it should thaw quickly (a day or two). Then I can fill it back up! The good news is we have way more juice concentrate that I had thought. When at Walmart a couple of weekends ago I noticed that frozen orange juice concentrate had gone up quite a bit since I stocked up in late 2021. It's now $2.14/can. In 2021 it was $1.39/can. I also have enough frozen butter to get us through a few more months. Anyway, I noted in our menus which items came out of that freezer.

The last few days I've been working on our Father's Day meal plans. I'll use several foods I have on hand. but I also went grocery shopping for some special foods. I bought frozen corn on the cob, a watermelon, some frozen roasting vegetables (baby red potatoes, carrots, onions, and zucchini), and two kinds of juice (blueberry-pomegranate and apple-cherry). I have some chicken-apple sausages in the freezer, pecans for baking a pecan pie, and tortilla chips and salsa. We're doing lunch on Sunday, so I'll also make coffee and tea. The weather looks less than lovely for Sunday, so we'll spend our time indoors. 

Do you have plans in place for celebrating Father's Day? How was your week? Any special meals that stand-out in your mind?

Wishing you a wonderful weekend!


Wednesday, June 14, 2023

Refreshing the Large "Welcome" Pot for $0


Is this the saddest "Welcome" pot you've ever seen or what? It sits on the patio in front of our front porch.


The other day I felt motivated to tackle that pot. I worked on the "Welcome" sign first. I got out my gold metallic paint pen that I use for various projects, mostly greeting cards.


I pulled the sign out of the pot and decided to free-hand the edge first to see if I could keep my hand steady enough to do the lettering, as well. I was basically going over the original gold on the sign.


Once the edge dried, I bit the bullet and tried going over the "L" as it seemed the easiest of all of the letters. When that went okay, I did the rest of the letters. It turned out good enough. This is the great thing about redoing very large spaces like the outdoors. When outdoors, most people don't get close up enough to see where little flaws may be, but instead focus on the overall picture. It's a welcoming impression that I was after, after all.

Once the gold paint dried, I gave the sign two light coats of the Rust-Oleum clear coat to seal against weather. If it lasts a year, that's great. I'll redo the sign next spring, if need be. I now know I can do it.


While waiting for the sealer to dry, I amended the soil in the pot with some fertilizer and topped it with a couple of inches of potting soil, then went in search of plants for the pot. I moved the tiny hosta from the "before" pot to a nice spot in the ground near other tiny hostas, so he won't be lonely. I found this gigantic hosta as part of an even larger clump of hostas in the backyard. I divided off a chunk with the spade and settled it in the pot. I started a bunch of these autumn marigolds from seeds I'd saved 2 summers ago, and they were ready and waiting for a place to grow. It's just a simple planting, but it looks way more welcoming than before.

\

And the finished "welcome" pot. Now doesn't that look heaps better than the "before" pot?

P.S. The pot's sides are spotted with moss. I saved myself some time and labor and left the moss in place. I like to think of the moss as "charm".

Tuesday, June 13, 2023

The Second Harvest for My Garden

Following up on Cat's (Catherine Emerson) article almost 2 weeks ago, I'm planning for and starting seeds for a second harvest (mid-September through late October in my area).

I keep a memo in the notepad on my laptop outlining my late season gardening. It identifies potential second harvest spaces in the garden, what could go into those spaces, and by when I would need to get seeds started. 

Like probably all of us here, my gardening space has limits. For some vegetables, I only get one type from start to harvest before the cold weather comes back. With others, though, I can squeeze a second planting in after summer harvests. This includes the three planting troughs on the deck (spring planted turnips, beets, and Swiss chard), the patch with the garlic, and the patch with the sugar snap peas. The rest of my garden vegetables won't finish in time for a second planting.

Being on the deck where early spring warmth gets trapped, the troughs are planted early, with the first crops finishing in late June for the first trough (currently turnips, will be Swiss chard), early to mid-July for the second (currently beets, will be mache), and early August for the third (currently Swiss chard, will be turnips). Even with the early August trough, I can still plant a second crop in time by starting my seeds indoors under lights and transplanting the seedlings when the first planting finishes. I'll work in some extra vegetable fertilizer granules into the troughs before adding the late season plants. turnips to chard,  So far I've started seeds under lights for the later harvests of Swiss chard and mache.

The garlic will be dug sometime in late August, leaving me enough time to grow a quick green like spinach. And the harvested pea patch won't be planted with next year's garlic until late September or early October. So I will need a quick growing vegetable for the second harvest in that space, such as radishes.

Sound confusing? Trying to maximize my garden space feels a bit like some sort of shuffling game.

Monday, June 12, 2023

The Two Sealants I'm Using Outdoors This Summer


On Friday's post, Kris asked how I would protect the wood top of the table that I'm redoing from rainfall outdoors. I thought this would be a good time to mention the two different sealants I'm using for our outdoor improvements this summer. In doing some research it seemed clear to me that I needed two types of sealants, one specifically for wood and the other for a variety of surface types.

The first is a wood sealant that claims to be water repellant, Olympic Waterguard Wood Sealer. I sprayed the first coat on the top and sides of the table top earlier today. About 5 hours after spraying I brought it inside to cure. The surface feels almost oily. I'll see how it feels in a day or two. The product says to allow the sprayed surface to "rest" for 24 to 48 hours before use. I'll have to wait 2 days before I can spray the underside. The product provides UV and mildew protection, as well.

The other sealant is more along the lines of a spray paint in both its dry time and its feel, Rust-Oleum 2X Ultra Cover Interior/Exterior Clear. This product is from the same line as the green paint I used on the #10 cans to use as plant pots for some herbs on our grill station. So far, so good on those painted can plant pots. I've used this clear spray on another outdoor project already and appreciated the quick dry time, under an hour. It's suitable for wood, metal and plastic. Although the Rust-Oleum spray claims to be suitable for wood, I chose the other product for the table top, as I felt the Olympic product might do a better job, longterm, for the wood surface.

When I was watching those patio transformation videos on YouTube earlier this spring, the Rust-Oleum 2X paint was recommended by several vloggers for coverage, durability, and the ability to use this on plastic items. The Olympic stain product I came across on my own. I'm familiar with Olympic outdoor stains and sealers. The Waterguard line is recommended for decks, fences, and outdoor furniture. Water is supposed to bead up on the surface. We shall see . . .

Anyway, those are two products that I will be using for multiple applications as we improve our outdoor spaces this summer.

Thursday, June 8, 2023

Cheap & Cheerful Suppers for Early June, Plus Updates On Our Outdoor Improvements

I spent the first part of the week getting our watering figured out (still need parts to set up all of the soaker hoses). Mid-week I worked on cleaning the brick circular path in the center of the original vegetable garden (we've added 11 additional beds to those first 4 beds). And then finally I got back to working on a $5 table to use seasonally on the patio. Because I found myself rather busy every afternoon this past week, our supper meals were on the simple side.

Here's what we ate, plus some photos.

before -- one of the "arms" off the center circle in the original
vegetable garden
the moss was thick in spots and weeds galore

after -- I used the sidewalk scraper and a paint scraper 
to remove the moss from the brickwork.
It now looks like someone is taking care of the place.

Friday
stuffed grape leaves -- meat, rice, herbs, garlic, and onions in grape leaves
boxed Mac and cheese (for those who eat dairy in our house)
deviled eggs
garden salad
rhubarb pie

In mid-May, our neighborhood had a giant garage sale.
I asked my daughter to be on the look-out for small round tables
that could possibly find a home on our patio.
She spotted this table at one house and texted me some pics. 
They wanted $5, definitely in my price range.

Saturday
Swiss chard frittata
rice
rhubarb pie


Not only was the table a bargain, but it is a folding table,
so it can store compactly for the other 3 seasons.

Sunday
refried beans
rice or fried homemade tortillas
salsa
carrot sticks and dip


When I first saw the table, I envisioned it with
a darker wood stained top and black legs.
 I plan on unifying several unrelated  pieces of furniture and
outdoor decor with black paint and dark wood stain.
A couple of Saturdays ago, I unscrewed the table top from the legs
and spray painted the legs black with this indoor/outdoor paint.
I gave it 2 good coats.
I'll add a protective coat before reattaching to the top.


Monday
Live and Learn's curried peanut-pumpkin soup (Live and Learn, your soup is a go-to for us. Many thanks for sharing your recipe.)
scratch drop biscuits with homemade raspberry jam
garden salad

Tuesday
minestrone soup
freshly baked bread with homemade rosemary rhubarb preserves
garden salad

I've had the painted legs in the entry hall for
the last couple of weeks, letting the paint cure.
(Follow the yellow brick road --
our yellow brick entry tile.
When we bought this 1970s house,
we said replacing
the yellow brick "road" would be
one of our first projects.
Yet, here it still is.)
Wednesday
cook-out
hot dogs in homemade buns
three bean salad on tossed garden greens 
jello and fruit salad, using flat soda and plain gelatin for the jello part

Thursday afternoon I decided to tackle the table top.
I hauled it out to the deck and sanded
the old finish off the top and edges.

After sanding, I gave it a first coat of stain.
I want a darker look than this, so I'll add a second coat of
stain tomorrow. When I've got the stain how I want,
I'll seal the top, the edge, and the underside before
reattaching the legs to the top.
Stay tuned for a final photo when I've got this completed.

Thursday
minestrone soup (again)
toast
rhubarb pie

And one last photo update. Remember the primrose seeds I started in sifted soil? They've sprouted!


Now I've just got to keep them alive long enough to grow up into full-fledged plants.

So this was my week in activities and meals. What went on in your week? Any special projects? What were your favorite meals this past week?


Wednesday, June 7, 2023

Instant Stretchy Headband or What To Do With a Holey T-Shirt


 Take one t-shirt with unsightly holes. Lay it out flat and grab a pair of scissors.


Cut off the bottom 4 or 5 inches (heavier shirt, cut narrower band -- lightweight tee, cut wider band). No hemming needed.

Twist the band in the middle and double or triple it over until it fits snugly around your head.


Scrunch the headband on the top a bit. Instant, free headband.

What I really like about this (besides using something I was going to send to the rag bin), is that I tend to buy the same colors of t-shirts over and over. This one was one of three hot pink tees I had, 2 long sleeve and 1 short sleeve. So, I now have a matching headband for both my long sleeve and my short sleeve t-shirts.

Now what to do with other parts of the same t-shirt. Ideas?

~~~~~~~~~~~~~~~~~~~~~~~~~~~~~~~~~~~~~~~~~~
Be a voice that helps someone else on their frugal living journey

Are you interested in writing for creative savv?
What's your frugal story?

Do you have a favorite frugal recipe, special insight, DIY project, or tips that could make frugal living more do-able for someone else?

Creative savv is seeking new voices.


~~~~~~~~~~~~~~~~~~~~~~~~~~~~~~~~~~~~~~~~~~~~~~

share this post