Stay Connected

Monday, May 22, 2023

Critters Eating Seedlings, Stain and Sealer Really Does Repel Water, and an Interesting Patio Furniture DIY Project


Something got into both sides of my sunflower planting area, chewing two plants off at the base. Very frustrating. 


I quickly put some new seeds into a damp paper towel inside a zip loc bag to pre-sprout. It took about 3 days for the seeds to sprout this way, then I transplanted them into soil. These new seeds have given me a couple of tiny sunflower plants now started in pots under lights. The replacement sunflowers' growth will be behind the rest of the plants by about a month, but we'll still be able to enjoy the large flowers and gather seeds.


The can of deck stain and sealer I used on the deck lounge chairs claimed that water would bead up on the surface. This was old stain that the previous owners used. We replaced the wood deck with Trex years ago, so had no need for the stain. We saved the can of stain anyway, because why not? Anyway, after a couple of weeks of dry weather, the drizzle returned on Sunday afternoon. I went to check on the lounge chairs and found that the rain water was just sitting on the surface.


We have a small table that goes with the chairs that I haven't sanded and stained/sealed yet. I compared the water on the deck chairs to the surface of the table. The table's wood completely absorbed the rainwater. Not good for the wood. Anyway, I'll be sanding and staining/sealing this table in the coming week, too. The sealer could extend the life of this set for many, many more years (at no cost to me), if I keep it up each year.


An update from Monday morning. The water on the lounge chairs was still beaded and not absorbed.

I am still looking around for some nice seating on the patio near the fire ring to replace or add to the plastic Adirondack chairs. I've come across some very interesting DIY's for outdoor sofas, chairs, and sectionals. Here's one that looks do-able: 2 X 4 Outdoor Sofa


Imagine my surprise when I was in World Market this morning getting some miso soup mix and right there at the front of their outdoor furniture section was this sofa that has a similar look to the DIY ones I've been seeing online. I'm on the fence about DIY-ing this myself. But the vloggers on YouTube do make it look do-able.

That's my start of the week update. What's been happening in your life these past few days?


Thursday, May 18, 2023

My Project for Thursday

I'm continuing on with sprucing up our outdoor living spaces . . .

after one coat of stain/sealer

I didn't wake up thinking, "gee, today would be a good day to sand and stain/seal the deck lounge chairs." I actually thought I would be finishing the pillow covers for 4 patio pillows today. I was in just the right mood to do some refinishing, though. And the weather was perfect for this work.

We've had these chairs for over 20 years. I've cleaned them in past years, but I haven't stained or sealed them since the first year we acquired them. The wood is teak, so when I have cleaned or sanded them in the past, the color is honey-golden. But I wanted the color to be darker this year.

after sanding, before staining

After giving them a really good sanding, I went in search of some stain. At the very back of a stack of 1-gallon paint cans in the garage, I found a 35-year old can of deck stain and sealer. The previous owners bought this stain/sealer for the old wooden deck and left it when they moved. The lid on the can was a bit rusted, so I wasn't sure if the stain was any good. As luck would have it, the stain just needed stirring and I was good to go. I just needed a paintbrush and rag and I could begin. 

I put one coat on today and will put a second coat on tomorrow. They're looking good so far. 

I'll get to finishing those 4 pillows another day.

Wishing you a wonderful weekend!

Wednesday, May 17, 2023

The tools I use to clean a dirty, mossy, and algae-ridden brick patio and Trex deck

Last week, Farhana (in the comments) asked me which pressure washer I use for our patio and deck. I replied that I would go into more details in a post this week. So here it is.

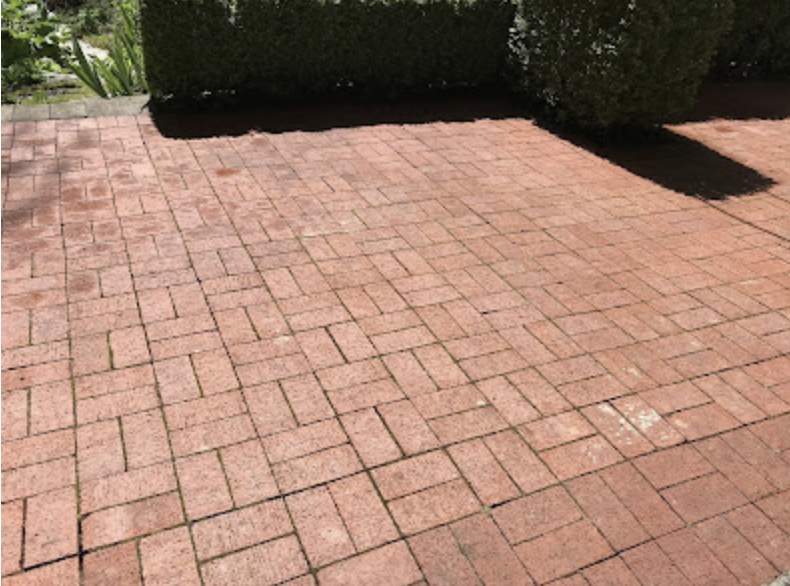
I live amongst lots of trees and lots of rain and wind. This combo means our patio and deck wind up mossy and ridden with green algae, with a massive touch of dirt in every crook and cranny. The moss can be an inch deep in the shady corners. It's a chore to clean it all. Up until this year, I'd used only a pressure washer to clean the deck, patio, aggregate walkways, and patio furniture. Then I watched a bunch of videos where women showed their best tricks for getting the outdoor living spaces clean in less time. 

What seemed like it would work for me was this combo and in this order:

  • a sidewalk ice scraper to remove thick moss and weeds 
  • a pressure washer spinning spray attachment (RYOBI) to clean broad paths of surface in a few swipes 
  • the focused wand spray nozzle on the pressure washer (AR Blue Clean) to clean the edges where the spinning spray attachment couldn't reach, as well as the tough dirt/algae
  • an outdoor push broom to move pools of water and dirt/grit off the patio
  • and finally, the broad spray nozzle on the pressure washer to wash away remaining dirt
I already owned my dad's sidewalk ice scraper. It's a tool that looks something like this:

Since we don't have much sidewalk ice in my area, I primarily use it to scrape moss and edge the lawn.

I also already owned an outdoor push broom. I've seen workers use push brooms to clear large puddles of water effectively before. So I thought this might speed up some of my work by manually moving excess water out of the way.

A couple of years ago, we bought this electric pressure washer:

Here's a link to the model on Amazon:

AR Blue Clean AR2N1 Electric Pressure Washer-2050 PSI, 1.4 GPM, 13 Amps Quick Connect Accessories, 2 in 1 Detachable Cart, On Board Storage, Portable Pressure Washer


I prefer electric tools over gas powered, due to my sensitivity to gasoline fumes. However, electric pressure washers typically don't have the amount of power as the gas models, and electric motors will need some time outs after running for extended time. I found that my model didn't need a time out for a couple of hours, about the time I'd take a break for lunch anyways. I'd leave it to cool down for about an hour, then start it back up again. Pre-cleaning the patio by scraping the moss off first with the manual tool meant I didn't need to run the pressure washer for as long (saved water in addition to electricity and the motor). 
What I like about this model:
  • price, it was reasonably priced for a tool I'd use twice per year, for a couple of days at each time. I paid more than Amazon's price, though. I bought ours at our local Ace Hardware. I wanted to give my business to a locally-owned place. And I knew if I had any issues with it, my local hardware store would honor my purchase and do whatever was needed to help me out. 
  • it comes with 5 different nozzle attachments which are easy to pop on and off.
  • it does a good job cleaning.

This year I bought an attachment that works on many different electric pressure washer models, the RYOBI surface cleaner.


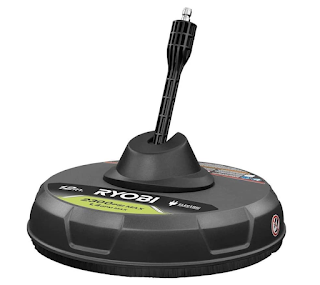
It snaps onto the extension wand of the pressure washer in the same way and point as the nozzles. The RYOBI uses 4 spinning, focused spray heads on its underside. It cleans an 11 to 12-inch span of patio or deck surface in a few swipes, speeding the overall cleaning time. The manufacturer claims this cuts the cleaning time to 1/4 that of using a spray nozzle alone. My experience is it likely cut my cleaning time to around 1/3 of that of nozzle alone. The end result for me was a mostly clean patio and very clean deck, compared to my previous experience of using a focused nozzle alone. Last year, I cleaned with a nozzle alone. I spent more time then, but did get the brick pristine clean. This year, after using the RYOBI, I went back over stubborn stains on the patio. 


The RYOBI not only cleans faster, but it's less laborious to use. With a nozzle alone, I have to keep tight control of the wand to get each section clean and without streaks. Using the RYOBI was more along the lines of using a vacuum cleaner.


Here's a link through Amazon to the model I bought:


RYOBI 12 in. 2,300 PSI Electric Pressure Washers Surface Cleaner


I bought mine, not through Amazon, but at my local Home Depot. I was going there anyways and wanted to get the RYOBI sooner rather than wait for shipping. I paid more at Home Depot than Amazon advertises.


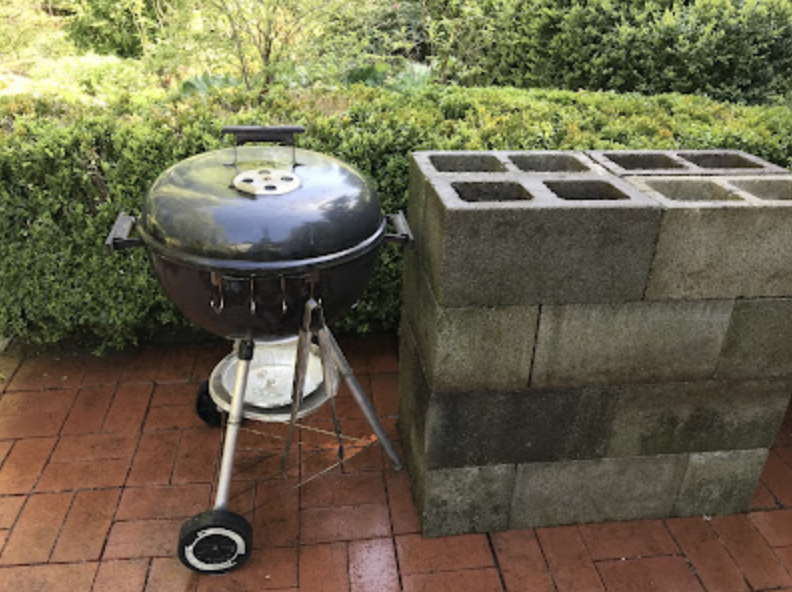
I was able to clean the deck and almost all of the large brick patio on one Saturday by myself. I cleaned the secondary patio where we put the grill station, and an aggregate walkway between the garage and the patio on a subsequent day. I will finish cleaning our deck and patio furniture with the pressure washer nozzle in the coming week. The wand spray nozzle works very well on the outdoor furniture. And if I feel up to it, I may tackle our driveway with the washer when summer is underway. It's due to another sealing and crack repair this year.


So, these are the tools I use and my experience getting our outdoor spaces sparkling for summer lounging and enjoyment.


Alternatives to buying expensive equipment:


For many years, I used a scrubbing brush and soapy water. To deal with tough mold and algae, I used a bleach and water solution sprayed onto the brick. It was laborious and took an entire week to clean what I can do in a day with the pressure washer.


Equipment can also be rented. I actually think renting equipment like pressure washers may be a better option. You can rent more powerful equipment, plus when it eventually stops working, that's not your problem. Most folks only use a pressure washer for a day or two per year. If you know that you will be able to do all of your cleaning in a brief period, like 4 hours, the cost to rent is very affordable. Home Depot rents pressure washers, in case you want to compare the cost of rentals.

Tuesday, May 16, 2023

How many frugal things can you spot in this photo?

Just a little game . . .


I sometimes like going through my day watching for ways I'm living out frugality. I had just such a moment this afternoon in the blueberry patch.

Gardening seems to bring out the frugal nature in many of us, especially so if what a person is tending is edible. 

Anyways, I came up with 6 frugal things in this photo, plus one frugal thing that I forgot to do.

Like any other puzzle, the answers are upside down at bottom of post.


Monday, May 15, 2023

Guess what this is?


My son and daughter-in-law gave this to me on Mother's Day. What do you think it is? If you were thinking a tiny oar for a tiny row boat, think again.

It's a "last drop" spatula.


At one end there's an itty bitty flat scoop, good for getting under the rim of jars or scraping out the last little bit from a narrow-necked bottle of tinted moisturizer.


The other end is larger, but long and narrow and more scoop-shaped for retrieving more product, such as the last of the ketchup stuck to the sides of the bottle.

Both scoops are made of silicone, and therefore are flexible. From tip to tip, the spatula is about 9 inches.

Anyway, my son and daughter-in-law know me well and found a tool that will help me reduce waste and save money.


Thursday, May 11, 2023

The (sort of) Finished DIY Grill Station With Countertops

Some DIY projects are never really finished.

Yesterday's post showed a grill station sans countertops. 

Adding counters makes a huge difference, IMO. We went to Home Depot this afternoon, as I'd mentioned yesterday.


The toppers that I found to use as countertops are extra large pavers, 16 by 24 inches. The pigments and surface texture are variegated throughout each paver to mimic natural stone. The colors range from rust and browns to slate gray. The underside is smooth, if that's the look we had wanted. One paver fit the narrow stack and two pavers, side by side fit the wider stack. These pavers were the only part of the grill station that we had to buy for this project. They cost $10.78 each, for a total project cost of about $35 including tax.

The paver overhangs both in front and back of the stack of concrete blocks. They're so heavy, it took us two people to place each paver. Although nothing is securing the blocks or pavers to each other, I don't think anything is going anywhere unless I physically lift it.


After Kris suggested potted plants in front of the stacks yesterday, I pulled a pot of peppermint from a shady spot on the deck and placed it in front of the wide stack. I'm going for an edible plant theme with the plant groups surrounding the grill station. The peppermint should be very happy in this filtered sunlight spot. 


On top of the wide stack I have plans for 3 pots of culinary herbs, one rosemary, one thyme, and one sage. The "pots" are also following a "food" theme. These are empty #10 cans from this winter's canned tomatoes. In addition to buying the pavers, I also bought 2 of the 3 herbs and a can of indoor/outdoor spray paint in the color Eden.


Before planting in the cans, I needed to prepare them to be pots. I used an old nail and hammer to add 3 drainage holes to the bottoms of each can.


Next I gave each can two coats of spray paint. The color of my pot cans is very close to the green in the outdoor fabric (shower curtain) that I will use to cover some cushions.


Here are the 3 cans, two with herbs placed inside. I'll pick up the sage when I go to Fred Meyer on Saturday. I won't be potting the cans just yet. I like to give painted objects a couple of days to cure before handling them too much.

The white marks on the pavers are scuffing from stacking and moving around of the pavers. The scuffing washed off fairly easily. The close-up of the paver above shows one section that had been wiped off with water and a rag -- scuff marks gone.


The entire grill station project was conceived of a week ago and put together in less than 2 days. It's definitely in the "do-able" category.

There's more to come on this small patio. Stay tuned. . .

Wednesday, May 10, 2023

My DIY Outdoor Grill Station

The yard improvement project continues this week.

you can see the previously-cleaned main patio through the hedge opening

There's a small section of the back patio that is partially separated from the main patio. It's been the spot for our tumbling composter and a kettle-style grill. Earlier this week I moved the composter to the side of the house near the garden. The grill was still in the garage, so I could really "see" what I had to work with in this space. I've had this idea that I wanted to make this small patio a dedicated grill spot instead of an incidentally-placed grill on the composter patio. Time to get busy with planning. I scoured the internet for grill station ideas and came up with a couple of plans that will work for my area and supplies.


Today I got out the pressure washer and began to clean the bricks. A good 2 hours later and the patio was scrubbed nicely. 


Some tulips got decapitated, however.

After a break to have lunch and rest for a bit, I headed out to work on the space some more. It was time to begin defining the grilling area. One of the DIY projects I found online used concrete blocks to create counter space on either side of a portable grill. I wandered the property and found enough concrete blocks for this purpose. With some help from my husband, we scavenged blocks from several spots in the yard. These blocks had served well in their previous lives, but now were ready to move on to new horizons.


While my husband ran an errand, I hauled the blocks, one by one, in a wagon to the brick patio. I had previously drawn up a plan for stacking the blocks. Consulting my plan, I stacked the blocks in 4 layers. The work was hard, but at least in the early layers, I still had energy.

I pressure-washed the stack of blocks and set the portable grill next to it.

At this point, I was ready to begin the second, narrower stack, but didn't have the 8 blocks needed. When my husband came home, he helped me scavenge these last eight. 

So this is where I finished up for the day. I have one 32-inch wide stack of blocks and one 16-inch wide stack. I will be going to Home Depot tomorrow to find something that will work as toppers/countertops.

For years, when I'd grill dinner, I'd set my utensils, trays, seasonings on the ground while cooking. I had wanted something that would serve as a counter next to the grill for cooking, but could also double as a buffet set-up for outdoor gatherings. And of course, I have a teeny-tiny budget, so I needed to work primarily with what I had. The concrete blocks were from previous uses. The only "things" I will need to buy are surfaces to use as countertops. 

I really wanted to finish this today, but dinner wouldn't make itself. Tomorrow I'll update with a photo of the station with counters and reveal my plans for the corner opposite the grill on this patio. For now, my muscles are tired, so, so tired. A good day's work.

Tuesday, May 9, 2023

Grocery Shopping April 2023

I'm sorry this is late, for those of you who enjoy reading about my grocery spending. April was a difficult month. As a result, I didn't keep track as the month progressed, but instead saved my receipts and am now tallying them. I won't list the individual prices or quantities for everything, but will give you an idea of what I bought and how much I spent in total at each store.

Spent $231.71 for month of April.

What was unusual about April's grocery spending:

  • a double birthday celebration
  • Easter breakfast and dinner, along with a postponed Easter due to daughter's illness, which meant buying strawberries a second time
  • stock-up on soy milk powder, eggs, flour, different meats, instant milk, snack foods for family, and I bought some boxed and canned foods on markdown
  • Sometimes I ran into the store just for 1 or 2 items as I happened to be in another business in the same strip mall. Sometimes I was shopping for gardening and home organization supplies in Fred Meyer, so I checked the clearance rack while I was there. This was not a very organized shopping month for me.
  • My daughters also stopped into stores for me while they were running their own errands (breaded mushrooms, 15-dozen case of eggs)
  • I did a lot of clearance rack shopping. Getting those bargains is a real mood-booster.


I shopped on 8 different days, going to one to three stores on any given day. Like I said, not organized.


April 1. Walmart $21.36   50 lbs flour, bananas

April 6. Swansons (online) $47.00  4 bags of soy milk powder

April 6. Grocery Outlet (salvage store) $9.98  coconut date rolls (Easter), Craisins, quick grits

April 6. Fred Meyer $5.10  asparagus, strawberries (for Easter dinner #1)

April 7. Fred Meyer $10.02  clearance rack: granola bars, cereal, canned vegetables, boxed donuts

April 15. Fred Meyer $32.93  clearance rack: instant milk, canned fruit, canned vegetables, canned pasta sauce.
Also bought chicken, pork loin, fresh strawberries (for Easter dinner #2 after #1 was canceled), tangerines

April 20. Chefstore (restaurant supply) $39.60  baklava, gyro meat (birthday celebration)

April 20. WinCo $27.18  produce, pita bread, tzatziki (birthday celebration), chicken breasts

April 22. Walmart $6.68  frozen breaded mushrooms (birthday celebration)

April 25. Walmart $1.87  bananas

April 28. Chefstore $29.99  15 dozen eggs


Did I spend more than recent months? Yes, but I was still comfortably within the range that I've determined for us. And I also have to take into consideration that we made 2 extended family meals for special occasions included in this spending. I do hope that May's grocery shopping focuses less on snack and prepared foods and more on basics to begin stocking up for next winter. We'll see how well I do. May is shaping up to be a better month overall for me, so that should help.


Monday, May 8, 2023

Growing Lettuce Vertically


This photo was taken 10 days ago. I now have 4 shelves of salad greens on my outdoor shelves. The shelving unit is actually the innards of this portable greenhouse, bought in February 2016. 


For growing salad greens on the shelves this spring and summer, I slid the plastic zip-up cover off of the shelf frame, and set the cover aside until fall rolls around. Because tall, narrow, and somewhat lightweight things tend to not stay upright in our gusty winds, here, I've secured this to the siding of our house with large hooks and bungie cords at the top and bottom of the unit. I did need to replace the bungie cords this season as the previous ones wore out. It's pretty secure against winds.

I'm growing the greens in the bottom halves of 1-gallon plastic milk jugs, the same "pots" I used indoors under lights this winter growing radish greens. I reused the soil from the radishes, stirring in fresh organic fertilizer specifically for greens to boost the nutrients for my little lettuce "patch".

I can add one more shelf of 2 rows of salad pots, when I have more empty milk jugs. That will give me 40 pots of lettuce, spinach, and parsley. 


I have staggered the seed starting dates, so that we will have a continuous supply of fresh salads through spring and into summer. The lettuce in this photo should be ready for the salad bowl in about a week. I will begin more heat-tolerant greens in early June so we don't lose our salads altogether when the weather warms up in July and August.

Although 3 rows of pots will fit on these shelves, I've only set up 2 rows, as the back part of the shelves doesn't receive the amount of light needed. As it is, I rotate the pots from front to back and back to front once per week, to ensure all of the plants are getting enough sun. 

Growing my lettuce vertically on shelves leaves the garden bed space free for larger plants, as well as keeps my lettuce out of the pathway of hungry slugs. In addition, growing vertically in this way has a much smaller footprint than growing 40 pots laid out side by side on the deck floor. 

Besides, I like the look of my vertical lettuce patch on shelves. There's something visually appealing about the tidy little rows of pots lined up on shelves, one shelf above another.

Thursday, May 4, 2023

Bonuses From the Garden

I'm busy planting and transplanting my vegetable garden this week. On Wednesday I moved small seedlings from tiny planting cells into larger planting cells for more root room while they get big enough to not be devoured by slugs.

As I transplanted these seedlings, I also thinned the varieties. As a result, I ended up with enough lettuce thinnings for a large family salad,


enough celery thinnings for a pot of vegetable soup,


and a few small basil leaves to add to pasta sauce. 


I try to use every last edible bit that I grow.

Hoping you have a lovely weekend!

Wednesday, May 3, 2023

Plant-Based Mosquito Repellants You May Already Have in Your Garden or Home

This time of year it seems that info about natural mosquito repellants proliferate on the internet. Some natural methods don't really have any science behind them, but rely on folk information passed down from one generation to the next. Sometimes folk remedies really do work. But other times, we may have better options. 

So, when it comes to natural methods to send the pesky blood suckers elsewhere, how can we know what could work? I came across a website, mosquitoreviews.com, that gives honest reviews of different flowers, herbs, and spices that are thought to help repel mosquitos. What I liked about this site is that it specifically mentions whether or not a plant-based option has undergone any testing, how long repelling coverage lasts, and whether to use as live plants or essential oils.

On the list of "yes it works"

  • lavender, as both a plant (anecdotally) and essential oil. More effective as an oil when paired with cinnamon oil, tea tree oil, or citronella oil.
  • marigold, in living plant form
  • catnip, especially in living plant form and alongside other known mosquito repelllant plants
  • basil, both as an essential oil and as a leafy plant
  • lemon eucalyptus as an oil is so well-regarded as an insect repellant that it is a main ingredient in alternative bug spray formulations
  • common eucalyptus, as an oil can mask a person's natural mosquito attracting scent
  • clove, as an oil can protected users for up to 225 minutes in laboratory studies
On the list of "yes, but for a limited duration"

  • lemongrass, as an oil effective against 95% of mosquito species for up to 2.5 hours
  • peppermint, as essential oil applied topically, effective for up to 45 minutes before reapplication necessary
  • thyme, as an oil repels mosquitos for up to 80 minutes
On the list of "maybe"

  • sage is a known folk remedy for mosquitos, although there's limited research. However sage as crushed leaves or as a live plant is a known natural insect repellant.
I already use some of these essential oils. In addition, I plan on potting some of the listed plants to keep in our patio seating area. It can't hurt. The plants will add beauty and fragrance. And they just might keep the little bugs away from me.

Bonus -- while not a plant, vinegar is one of the household items recommended as a repellant on mosquitoreviews.com on another interesting page. Check that one out, too.


Have you used any of these natural options to repel mosquitos? Did they work?


Tuesday, May 2, 2023

A Cheerful, Thrifted Shower Curtain to Become . . .


covers for our old, stained and faded patio cushions. The lime green and white geometric print will brighten up our patio seating. 

It's a woven 100% polyester shower curtain, originally from Target. I bought this at Value Village on Senior discount day for $4.50. It measures 72 by 72 inches, enough to sew covers for 4 18-inch square cushions, with some extra fabric leftover. I priced outdoor fabric at JoAnn Fabrics and found many that I liked priced at $9.99/yd on sale. With the shower curtain, I basically got 2 yards, with extra width (most of the outdoor fabric at JoAnn's was 60 inches wide), at about 1/4 the price of new outdoor fabric.

I need to buy some all polyester thread and then I'll be ready to sew these up. 

Monday, May 1, 2023

Saturday's Free, DIY, Rustic Garden Bench

our new, completely free, rustic garden bench

I've mentioned that my project this spring and summer is improving the beauty and usability of our yard. Over the weekend, the four of us put together this rustic garden bench in a woodsy area of our yard. 

the neighbor's rustic bench

I was inspired by a neighbor who had made a similar bench in their side yard. They used 2 logs, standing on end, to support a plank of wood which is anchored at each end by heavy flower pots. I thought, "okay, this is doable."

Once home, I wandered our property and found a stack of logs (from the tree that fell on our roof in 2021), a pressured-treated board from our old deck, and 2 flower pots plus extra primroses to fill out each pot -- everything we'd need.

Saturday afternoon, when I finished up with pressure washing the patio, I called for my team to help me with the bench. We moved some stepping stones over about a foot to make room for the bench. The stepping stones will also serve as a footpath through the Lily of the Valley to get to the bench for thoughtful moments sitting. After this little chore, we rescued the board from a pile of wood scraps. My husband joined us womenfolk to help pull out some nasty-looking nails from the board. While I leveled the dirt, my daughters fetched the 2 logs. After getting the logs in place and adding the board, I prettied up the pots with more flowering plants and set one on each end of the board. 

The new bench is just off the gravel walkway, a few feet from one of the cherry trees.

For something so simple, we sure are enjoying our handiwork (and I'm thankful to our neighbor for providing inspiration). The pots and bench are visible from the deck and beckon me to come and sit for a while, which I did just after taking care of garden chores this afternoon.


Thursday, April 27, 2023

Using Powdered Soy Milk

NOW Foods Organic Soy Milk Powder, 20-oz

I realize that many folks eat soy products. But if you do, I wanted to share my experience with a product.

I discovered this soy milk in April 2020. It was one of those foods I could order online to have shipped to my home. And it was a food that was shelf stable and I could add to my emergency pantry. I ordered 4 bags through a natural foods/supplement online store, using a first time buyer discount coupon, At that time, with a couple of discounts, I was paying the equivalent of $1.03 for a quart of reconstituted soy milk. That was an amazing price. I just recently finished off the fourth bag. I had kept the bags in my cold storage room and even at 22 months past the sell-by date the last spoonful tasted just as fresh as when I opened the first bag.

In placing another order, I went through a different online vitamin/supplement store, getting another first time buyer discount code plus free shipping. As with absolutely everything else, the price had increased substantially since 2020. Now, even with discounts, my price for a reconstituted quart is $1.56. For a shelf-stable soy milk, that's still a pretty good price for my area.

What I like about this powdered soy milk:

  • it's made with organic, non-GMO soybeans
  • it contains no added sugar, no gums, no thickeners -- it's just organic soy milk powder. This is very important for me as gums and thickeners (like carrageenan) make me physically sick.
  • with no added sugar, I can use it in savory sauces, like cheese sauce, without adding sweetness
  • because it's powdered, I don't have to worry about wasting any, or an open quart spoiling before I can use it
  • I make as little or much as I need at any one time. It mixes with water easily. 
  • less wasteful packaging. It comes in a durable, resealable ziplock bag that I wash and reuse for other foods when empty. 
Each 20 oz bag makes 30 8-oz servings, if made with 4 tablespoons of powder. I often use 3 tablespoons per 8-oz serving, meaning my yield of servings is more like 40 per bag. However, I do my calculations for price per reconstituted quart based on the 4 tablespoon serving size, as the protein content in 4 tablespoons approximates what's found in 8-oz of liquid soy milk or cow's milk.

I primarily use this in my lunch smoothies, adding the powder and water separately to the blender, saving the step of mixing the two together. But I've also used this in muffins, cakes and cupcakes, custard-based pies (like pumpkin), rice pudding, cornstarch pudding, cheese sauce, white sauce, peanut butter protein balls, and any recipe that would normally call for milk that I make for my family that I also want to enjoy. (If I'm making something for my family that I don't think I'll eat, I just use the regular cow's milk -- that's cheaper.)

Drawbacks to powdered soy milk:

  • there's a lot of settling in reconstituted product after standing for several hours
  • the taste for drinking is okay. It's not bad, it's just unsweetened and unflavored. If I wanted to drink a glass of this soy milk, I'd add vanilla extract plus sugar or honey to improve the drinking flavor. But I find it to be fine when reconstituted and poured over cereal, cream of wheat, or oatmeal, sometimes with a pinch of sugar added.
  • it's not a good substitute for coffee creamer. Like every other soy milk I've tried, it curdles in hot coffee. And I don't feel like it lightened my coffee or gave it much creaminess.
I have wanted to share my experience with powdered soy milk for a while, as not a lot of people know a powdered version of soy milk exists. For someone who already uses soy milk, this product might meet a need.

Wednesday, April 26, 2023

My Deck Trough Planters

Detroit Red and Crosby Egyptian beets in this trough

Live and Learn asked about my trough planters, so here's the deets.

I have 4 of these planters, all the same size and color. I bought them in 2009. They're made of a UV stable plastic that has held up very well. At the time I bought them, they were available in white and dark brown. I chose white. But in my mossy, messy climate, I sometimes wish I'd chosen the dark brown. I haven't yet cleaned the outside this year. While they look dingy right now, they'll clean up pretty well when I power wash the deck this next week.

Their dimensions are 16 inches high, 39 inches long, and 17 inches front to back.  I've successfully grown leafy greens as well as root crops, such as turnips, beets, and carrots. The height seems to be enough for these veggies. This year I have Swiss chard, beets, turnips, and a mixed trough of perennial herbs (rosemary, lavender, thyme).

With the vegetable-only troughs, every year in spring, I remove about 4 gallons of soil and replenish it with 4 gallons of compost/garden soil blend plus a handful of fertilizer appropriate for the particular plant. With the perennial herb trough, I only amend the soil in years that I'm replacing plants (which would be this spring). The herbs I grow in this trough tend to like well-drained soil and and can tolerate poor soil.

I initially bought these troughs for a combo of herbs and flowers to add color and life to the long, narrow deck. Then I discovered some veggies actually did better when up and off the ground, and could be planted sooner in the season, as our deck is on the south side of the house and catches heat better in spring than the garden.


My deck garden grown in troughs and pots is pitiful compared to one famous "secret" garden in Seattle. At Pike Place Market there's a patio garden that grows vegetables, herbs and flowers in troughs and pots, primarily serving a food bank located in the market. Most folks that visit the market never see this garden. You have to follow several corridors to find your way onto the patio. But when you come through the doorway, a colorful invitation into an urban garden masterpiece greets the viewer.

The garden uses a variety of planters, pots, and raised beds. I find their use of livestock watering troughs to be charming -- something so rural in a place so urban. Most of the vegetables are grown in these galvanized planters.


In spring, volunteers come together to plant seeds and tiny starts. They may look somewhat bare in early April. But by late May, the planters are overflowing with greens, herbs, peas, beans, the beginnings of some summer squash, cucumbers, and developing tomatoes. The garden is available to the public to visit. If you find yourself in downtown Seattle some day, ask the fish throwers, "which way to the urban garden?" 

Tuesday, April 25, 2023

When a restaurant meal sounds too expensive, but you still want to have a restaurant-type celebration . . .

Our quasi-frugal birthday celebration this past weekend

This past weekend, we celebrated both my husband's and my birthdays. Our birthdays are 6 days apart. Now that everyone's schedules so much more complicated, we just lump the two birthdays together for celebrating. 

Last month, we began talking about eating in a restaurant to celebrate. In case you hadn't guessed by now, dining out is exceedingly rare for us. Anyway, we talked about which restaurants all 6 of us might enjoy. We have a favorite, locally-owned Greek place that we all enjoy. I went online to check their menu prices, and man oh man, has there ever been some inflation. I knew I wouldn't enjoy the meal if I was thinking about the final bill the whole time. 

After about an hour of brainstorming with my family, we decided to just do a Greek meal at home. However, I didn't want to be the one cooking, and I didn't want my daughters to be saddled with a lot of unfamiliar and time-consuming cooking. That's when I thought to check the website for our local restaurant supply. Between the restaurant supply and WinCo we could pick up everything we'd need to put together gyro sandwiches, a tossed salad, fried mushrooms, and baklava for 6 of us with minimal effort (my daughters put it all together) and for less than half of what a comparable meal would have cost at the little Greek kafé near us. As a bonus, we had a bunch of leftovers, notably the seasoned gyro meat. 

This is what we bought:

5-lb box frozen cooked and seasoned gyro meat
6 ct pita bread
10-oz tzatziki sauce
large head Romaine lettuce
3 Roma tomatoes
1 red onion
12 ct frozen baklava
1 box frozen breaded and fried mushrooms

Everything was delicious. And my daughters were even able to push a birthday candle into my and my husband's baklava. So no "wishes" were lost by not having cake. And as I mentioned, we have a lot of the flavorful meat slices left in the freezer. Our Friday pizza nights just became Friday gyro nights (until the gyro meat is gone, that is).

One of the shocking discoveries I've had shopping in a restaurant supply store is how much pre-prepped items they sell. My guess is that many restaurants are using these items to speed up production and shave costs on kitchen help. This makes a lot of sense. For example with our Greek dinner, I can't imagine how involved it would have been to actually make baklava from scratch or the amount of time saved with the meat, all seasoned, cooked, and sliced for us. Knowing this, when my family next wants a restaurant style meal for a celebration, we can buy some ready-to-assemble ingredients from the restaurant supply, and put in a little effort on our part, to save about 50% the cost of a comparable meal out and not suffer any taste or quality.

Not as cheap as a scratch-cooked meal, but much more enjoyable for the cooks and without the high price tag of a restaurant.

Monday, April 24, 2023

Shallow Soil Carrots Planted in Pots


I planted our carrots this afternoon. As I've done for the last 3 years, I'm growing carrots in large, 13 to 15-inch deep pots. Growing root vegetables in pots sounds like it could be problematic. However, I've found that by choosing varieties that don't need as much soil depth, I have more success with root crops in large pots or trough planters for 3 main reasons:

  • control the soil -- Where I'm kind of stuck with the soil that is presently in our raised garden beds, I can affordably add whatever type of soil a particular plant might need to a pot.
  • control the pests -- slugs are one of our biggest pests when it comes to carrots. I tried some of our carrots in one of the beds last year and lost every single one to slugs eating the tops before roots could form.
  • control the sunlight hours -- a pot can go on a deck, a front porch, a back porch, lining a walkway, set into a flower bed. Wherever there is ample sunlight, a pot can go there.

I've planted Danvers Half Long carrots in 6 pots this year. Judging by previous carrot harvests from pots, I expect the yield to be around 20 pounds or maybe a bit more. Other varieties of carrots that can be grown in pots include the small round carrots like Parisienne Market carrots and short and fat carrots like Chantenay Red Core carrots. I've read recommendations that pots should be a minimum of 12 inches deep for success with these shorter root carrot varieties. 

The primary drawback to growing veggies in pots is the need for constant watering. A pot  can't hold the amount of moisture that an in-ground bed can, and therefore dries out faster. Once our rainy season comes to an end, I'll have to water these carrot pots every day.

In addition to growing my carrots in pots, I have other root veggies growing in containers this year, turnips and beets in trough planters on the deck. The troughs are deeper than my large pots, which means they will hold more water as well as provide more root room. I didn't have to find specific shallow soil varieties for the beets and turnips.

Another money saving tip -- I bought these seeds at the end of last year on clearance. The overwhelming majority of vegetable seeds have great viability in year 2. The "packed by" date is simply when the seeds were packaged, not when they expire.

~~~~~~~~~~~~~~~~~~~~~~~~~~~~~~~~~~~~~~~~~~
Be a voice that helps someone else on their frugal living journey

Are you interested in writing for creative savv?
What's your frugal story?

Do you have a favorite frugal recipe, special insight, DIY project, or tips that could make frugal living more do-able for someone else?

Creative savv is seeking new voices.


~~~~~~~~~~~~~~~~~~~~~~~~~~~~~~~~~~~~~~~~~~~~~~

share this post